Last updated on March 17th, 2024 at 01:16 am
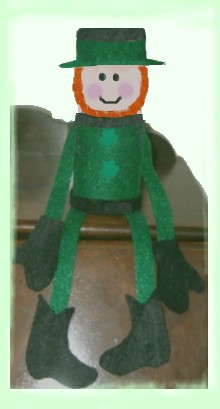
I found this little guy sitting on a shelf at the thrift store and I had to take him home. He was obviously made by a creative child – but where, why and how he came to be sitting on the shelf waiting for me to buy him is a mystery. Still, everyone knows that leprechauns appear when you least expect them, so I think this must be some sort of St. Patrick’s Day magic at play.
by Jane Lake
You will need:
- toilet paper tube (or a paper towel tube, cut to the length that you want your leprechaun to be)
- felt – green and black
- craft paint for facial features
- black marker
- three shamrock stickers
- orange chenille stem or orange yarn for beard
- a little gold cord to trim the hat
- craft glue (or, for adults or older children, glue gun and glue sticks)
- measuring tape or ruler
- pencil and paper
- scissors
What You do:
Measure the length of your tube, and draw a line around the center point. Below this line will be the leprechaun body; above it is the face area.
Body:
1. Measure from the bottom of the tube to the center line to get the length of the leprechaun body. Measure around the tube to get the width measurement. Cut a piece of green felt to these dimensions and glue it to the bottom of the tube.
2. Cut two strips of black felt, about a 1/2 inch wide, and long enough to go around the tube. Set these aside.
3. Cut two green felt strips for the leprechauns arms, and two longer strips for the legs.
4. Glue the top of one arm to the top of the green felt body. Glue the other arm exactly opposite the first one.
5. Glue the top of the legs to the inside of the toilet paper tube, so that both legs face forwards, as shown in the photo.
6. Draw a mitten pattern, and a boot pattern, on a piece of paper. Cut these out and use them as templates to cut out a pair of mittens and a pair of boots from black felt. Glue the mittens to the end of the arms and the boots to the end of the legs.
6. Glue one of the black strips that you set aside earlier to the bottom of the leprechaun body, beginning and ending the strip at the back. Glue the second strip in place like this, positioning it at the top of the body, and going over the top of the arms.
Glue two shamrock stickers to the front of the body, as shown. The body is now complete.
Leprechaun Face
Draw a line around the tube, halfway between the top of the body and the top of the tube. The bottom half is the face area; the top is for the hat. Paint the face area in flesh-colored paint. You could also leave it plain if it looks okay as it is. Let the paint dry.
Draw two black dots for eyes, and a small smiley mouth. Paint pink blush circles at the ends of the mouth.
To make the beard, bend a chenille stem into “U” shape and test fit to see if it will go from the top of one side of the face, around the bottom (or chin area) and up to the top again. Cut the stem to this length. If the stem is not thick enough for a beard, cut another stem to the same length and twist them around each other. Bend into the final shape and glue in place around the face.
Hat and Hat Brim
You will need to cut a felt circle for the hat brim, with another circle cut out from the middle for the top of the hat.
First, draw the center hole by placing the leprechaun upside down on a piece of paper and tracing around the tube. Or draw around another toilet paper tube of the same size. Now, find a drinking glass or another round object (or use a pencil and compass) to draw a second circle around the first, in the size needed for the hat brim. Your pattern should now be the shape of a donut. Cut both circles from the paper. Test fit the paper brim by drawing it down over the paper tube. Test fit the paper hat top by placing it on top of the tube. Make adjustments, if needed, then use these paper templates to cut two circles from green felt.
Slide the hat brim over the paper tube and down to the top of the face area.
Cut a piece of green felt long enough to go around the paper tube and as wide as the measurement from the hat brim to the top of the tube. Glue this in place as the hat and glue the green circle that you cut earlier on top to complete the hat.
Glue a piece of gold cord or thin ribbon around the bottom of the hat, right above the brim. Finally, add the last shamrock sticker to the front of the hat.


Leave a Reply