Last updated on July 30th, 2015 at 10:23 pm
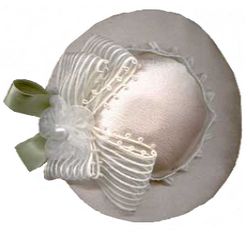 This pin cushion looks like an elegant ladies hat, but is actually a practical way to keep your pins and needles organized. If you have some cds or DVDs to recycle, use them as the base instead of cardboard circles.
Material:
- Cardboard (inserts from stocking or shirt packaging work great)
- Fabric Scraps
- Ribbon Scraps
- Ruler
- Compass
- Needle and Thread (thread colour is not important)
- 2 inch Styrofoam Ball
- Batting Scraps or Fibrefill (batting works best)
- Miscellaneous Embellishments (Ribbon Roses, etc.)
- Hot glue gun and sticks
How to:
These are very easy to assemble – it’s explaining how to do it that I found difficult. Please refer often to the diagrams accompanying these instructions and you should be able to make these easily.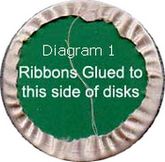
You can make these with or without the needle holder. The needle holder simply includes an additional disk section that closes to protect the needles and your hands. Begin by cutting four (two if you don’t want to make the needle holder) circles measuring 4 1/2 inches from lightweight cardboard. The green section in diagram 1 is my cardboard circle. You can cut the disks using a compass or a bowl or glass that measures approximately 4 1/2 inches across the centre of the circle.
Lay one cardboard circle on top of a fabric scrap and cut around the circle adding approximately 1 inch around the entire circle (referring to diagram 1, you will see that you need a little additional material to cover the cardboard circle). Repeat cutting fabric scraps to cover all four pieces of your cardboard. I used two different fabrics for this. One colour for two circles and another colour for the other two circles. Though the photo is not clear enough, I used a darker fabric on the inside disks and a light fabric on the out side disks.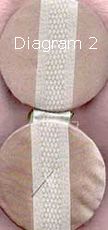
Cut an additional circle (this will be the pin cushion section of the hat), using your cardboard as a template, but cut the fabric approximately 2 inches larger, all the way around your circle. You do not need to cut a perfect circle for this, as the edges of your cut circle will be hidden, once the hat is assembled.
Cut your styrofoam ball in half. You will require only one half to make this hat. Cut batting to the size of each cardboard disk (do not cut larger than the disk, but to fit one side of the disk only). Cut an additional piece of batting to fit the styrofoam ball half. Again, enough to cover just the rounded part of the styrofoam ball and not the flat cut edge of your ball.
Sew a gathering stitch (straight in and out stitch, without securing either end of thread to the fabric) around each circle of fabric (five pieces in total).
Place one piece of batting (you can secure this with a little glue if you prefer) on top of one cardboard circle, place one fabric circle on top of the batting and turn the edges of the fabric to the opposite side, pulling your gathering stitch (as shown in diagram 1). Tie or secure your gathering stitch with a little glue. Repeat for all of your 4 1/2 inch cardboard disks.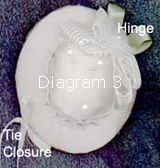
Lay your batting piece for the styrofoam ball over the rounded section of the ball. Place your fabric section on top of the batting and once again, fold the fabric edge to the flat side of your ball, pulling the gathering stitch and tie or secure your gathering stitch with glue.
Now that you have all sections of your hat covered with fabric, you can begin to assemble it. You need to create a hinge for the hat to open and close without separating. Hot glue in place a small piece of ribbon to the wrong side (view shown in diagram 1 is the wrong side) of two disks. If you have chosen to use two different shades of fabric, glue the ribbon the disks that have the same fabric (you can see the hinge at the centre of the diagram 2).
Glue a matching ribbon strip to two disks (this ribbon will be your needle holder section). The ribbon will be placed right side up against the fabric disks used for the inside of the hat and secured with glue on the wrong side of the same disks. Diagram 2 shows how your two disks should look once you have completed this step. To create a tie closure, glue a small ribbon piece to the oposite end (directly across) of where you glued your hinge ribbon (see diagram 4). All of these ribbon ends will be hidden, once completely assembled.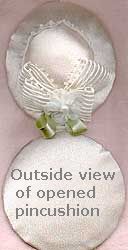
Using hot glue (you can sew this if you like), together the disk you just added ribbon to and a disk that has no ribbon added. Keep the glue very close to the edge of the circles, without allowing the glue to be visible. Repaeat for the other two disks. You will end up with two complete disk sections, with fabric covering both the front and back of your disks and all ribbon ends will be hidden between the two disks. Your ribbon hinge will hold these two sections together. Refer to the diagrams below as they are provided to help with the clarity of my instructions.
With hot glue (you can sew this if you like) secure your covered styrofoam ball to the top centre of your hat. Again, keeping close to the edge of your ball.
Glue a small piece of ribbon or lace around the edge of the styrofoam ball. This ribbon will not only add a decorative feature, but will hide the join of the styrofoam ball where it is attached to the disk. Diagram 3 shows the placement of the ribbon.
For this hat I made two bows from the same ribbon (one being slightly smaller than the other), and a matching bow from silk ribbon (green). Refer to the main photo and diagram 3 for placement of the embellishments. All embellishments are attached at the hinge section on the top of the hat. Before attaching your bows to the hat, lay them out, as you would like them to be assembled. This way you can make any adjustments before you attach them.
Beginning with the largest ribbon bow, I placed the second matching ribbon bow on top, placing the green ribbon bow on top of both of these ribbon bows and then adding a final ribbon flower with a white pearl to the top, I glued these all in place on the hat.
Thank You Katy! Katy suggests using old CD’s instead of cardboard for the disks. A great idea!
Copyright © 1999-2014 Susan Spatone All rights reserved
Leave a Reply