Last updated on January 5th, 2025 at 10:33 pm
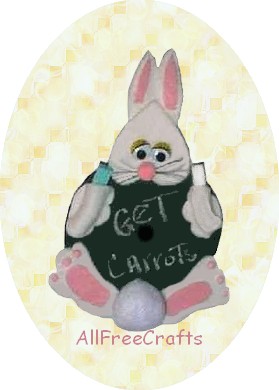
Such a wonderful way to recycle unwanted CD’s – make an adorable Easter bunny chalk board!
by Twila Lenoir
Make an Easter Bunny Chalk Board from a Recycled CD
Craft Supplies:
» any unwanted CD disk
» black acrylic paint or chalkboard paint
» black, white and pink felt
» 1 large white pompom
» 6 tiny pink pompoms and 1 small pink pompom
» goggle eyes
» whiskers or black embroidery floss
» chalk
» sponge
» magnet
» Printed Recycled CD Bunny;
See more Easter Bunny Crafts
Craft Instructions:
1. Trace the CD onto the black felt.
2. Paint the CD black – this may take three coats for total coverage. Set aside to dry.
3. Trace the rest of the pattern pieces onto the felt colors that are shown in the photo. I forgot to draw on the paper the pink in the ears, so just cut out two pink pieces, slightly smaller than the white ear shapes, and glue in place as the inner ears.
4. Glue the ears to the back of the upside down heart face.
5. Glue the whiskers to the point of the heart, and glue the pink pompom on for the nose. Add the goggle eyes close to the nose.
6. For the feet, glue the palm in the center and glue the tiny pink pompoms for the toes.
7. Constructing your black CD:
First glue the black felt circle to the back of the CD then glue on the magnet near the top. Turning to the painted side, glue your large white pompom to the bottom of the CD, and then glue the feet at an angle touching the pompom.
Put a line of glue on the bottom of the heart shaped head, and glue this to the top of the CD (see photo for details). Glue the outside of the paws to the edge of the CD and glue the paw tips in, so that you can put in the chalk and the tiny piece of sponge.
I wrote “Get Carrots” with the chalk, but I’m sure you can come up with a better phrase. Put your sponge and chalk in the bunny’s paws. Now you have a cute recycled CD Easter bunny chalkboard for memos and messages.


Leave a Reply