Last updated on December 18th, 2024 at 06:31 pm
Fold together a recycled cardboard vase, apply sponge paint, and fill with dried or silk floral arrangements.
by Carol Morrison
Would you ever guess that the tall decorative vase holding these pretty autumn flowers was once part of a shipping box? It is made from heavy-duty corrugated cardboard recycled from a box used to ship furniture.
To make your own, you will need a similar supply of corrugated cardboard. If you’re not planning a furniture purchase any time soon, you could likely recycle what you need from the stash of boxes at your local grocery or department store, free for the asking.
Project Supplies:
- strong, corrugated cardboard
- tacky craft glue
- acrylic craft paint, in colors of your choosing
- fine glitter or glitter paint
- newspaper
- small block of florist’s foam
- seasonal silk or dried floral stems
- straight edge measuring stick
- pencil
- scissors or box cutter
- sponge or rag
- ribbon
Project Instructions:
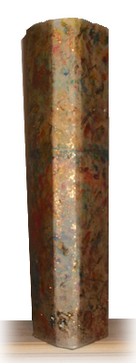
1. The vase shown here is four feet high and folded into a free-form pentagon shape, but you can alter the shape and measurements to suit your needs.
First, decide on the approximate height and the shape of the vase, then how wide you want each side to be. The number of sides, of course, will depend on the shape of the vase. Add up the approximate width of all sides, then add an inch or so for the overlapping seam, to arrive at a total width dimension for cutting.
2. Use the pencil and straight edge measuring stick to draw a rectangle on one side of the cardboard box to your desired height and total width measurements. Make sure the corrugations in the cardboard run up and down the height, not from side to side, to help with folding in the next step. Cut out this piece of cardboard.
3. Place the cardboard flat on a table, back side up, then measure and mark your fold lines. These lines should be set equally apart to create a specific shape, or you can fold them in a free-form fashion to make a uniquely shaped vase. With either method, you must remember to allow an extra fold of an inch or so on one side of the width for the seam overlap.
4. Begin folding the first side inwards. If necessary, score the fold line first by pressing down with the tip of your pencil, but be careful not to poke through the cardboard. Repeat with all the sides of your vase, plus the seam overlap.
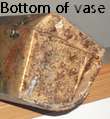
5. To form the base of the vase, score and fold a flap on the bottom of each side, folding the flaps inwards and using enough material so that the flaps overlap to make the vase bottom, as shown in our photo.

6. Apply tacky glue to the overlapping edges of the side seam, slide the smaller edge under, and press both pieces together. If needed, temporarily hold the vase together until the glue is dry by securing it with a rubber band or tying with twine.
7. Apply tacky glue to the bottom flaps and press them together.
8. Once the glue is dry, you may weigh down the bottom for extra stability by adding a layer of small stones or pebbles. Stuff the middle of the vase loosely with balls of a newspaper. Cut a block of florist’s foam to fit your vase and place it in the top.
9. Sponge paint the outside of the vase in your base color, then randomly sponge on a second and third color of paint, in coordinating or contrasting colors. If desired, apply fine glitter to parts of the wet paint, or randomly sponge on some white glue diluted with water, then apply the fine glitter. A matte or gloss seal coat applied over the dry paint and glitter is optional but will help protect your finish.
10. Finally, tie a coordinating ribbon around the top. Fill your recycled cardboard vase with seasonal flower and leaf arrangements, poking the stems through the florist’s foam to secure in place.


Leave a Reply