Last updated on March 8th, 2018 at 11:31 pm
Here’s how to make a rockin’ little turtle from rocks and small pebbles.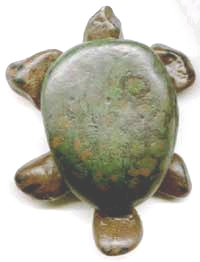
I think this project is an excellent summer nature craft for camp, scouts or guides.
by Susan Spatone

You Will Need:
Rocks and pebbles
E6000 or Household Goop Glue
Green and Brown Patio Paint
Polyurethane or Outdoor Varnish (optional)
Project Instructions:
This is a quick and easy project and makes a great paper weight for Dad or use as a garden ornament.These can be made as large or small as you like and they are really inexpensive to make.
Begin by collecting a few stones, pebbles or rocks. They can be any size. My turtle measures about two inches from head to tail. After making this little turtle, I headed for the garden centre and picked up some large stones to make another turtle to use as a garden ornament. The large turtle will measure about 12 inches once complete and the cost to purchase the large stones, was only 75 cents.
Arrange your stones on a flat surface until you’re satisfied that they work together. Wash your stones with dish detergent and water, rinse well and allow the stones to dry completely. Once dry, paint the stones that will become the legs, head and tail with a dark brown paint and set aside to dry. Paint the body stone with a dark green paint and allow it to dry.
To add a little extra detail to the body stone, paint little circles using a mix of the dark green and brown paint. Add a few dots of brown randomly inside the darker circles and allow the paint to dry.
Glue the legs, head and tail to the underside of the body stone. Allow the glue to dry completely. Patio Paint on its own will withstand most weather conditions, but for a little extra protection, you can add a coat of polyurethane or varnish.
Copyright © 1999-2018 Susan Spatone All rights reserved.
Published with permission from CraftAtHome.com


Leave a Reply