Last updated on March 4th, 2016 at 12:30 am
Mix a batch of cement and make your own homemade stepping stone to welcome visitors to your garden.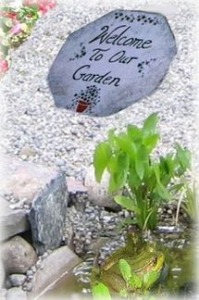
Craft Supplies:
- Cement
- Patio Paint
- Screening mesh
- Mold (No need to buy a mold, a cake pan, large dish, etc., will work fine)
- All purpose Craft Glue
- Cooking Spray
Craft Project Instructions:
The amount of cement you need to mix will depend on the size of mold that you choose. This project needed about eight pounds of cement. The first thing you need to do is cut a piece of plastic or wire mesh in the shape of the mold.
To do this, place your form on top of a piece of mesh and with a craft knife or other cutting utensil, cut around the form. This is very important! Cement doesn’t hold up as well as plaster when it comes to cracking and you need this extra support. Place your mesh over the mold to make sure it fits without any overhang.
Prepare your mold for filling by cleaning with a little dish soap, dry completely and spray with cooking spray or wipe cooking oil over the entire inside of the mold. This will allow for easy removal of your finished piece.
 Now begin mixing the cement – first, add cement to a deep bucket or container, then gradually add water until the cement reaches a consistency that is not syrup but can be poured into your mold. Once you have completely mixed your cement, add some craft glue (about 1 tablespoon for every 2 cups of cement). The glue helps the mesh to bond better to the cement. Mix completely.
Pour the mixed cement into the mold until it is half full. Place your mesh on top of the poured cement and press the mesh gently into the cement. Now add more cement on top of the mesh until the mold is full.
VERY IMPORTANT!! Now that your mold is poured, do not move it! Moving it will cause the cement to crack. It’s not maybe it will crack… It will!! Allow the cement to dry completely (follow package instructions for drying time) and then gently remove your piece from the mold.
Run a little warm water over your mold to remove any cement dust and oil that is sitting on the surface and allow it to dry.
Though you don’t have to use patio paint… it’s the best one for this project. Paint the finished stone. Allow to dry. This project was painted with grey paint and then a stencil was used to paint the design and the writing was done free hand (you could also use a stencil for the lettering). Allow to dry completely.
.
Copyright © 1999-2016 Susan Spatone All rights reserved.
Published with permission from CraftAtHome.com

Leave a Reply