Froggie Photo Frame
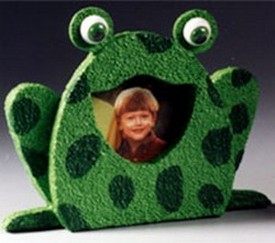
Make it a “Hoppy Mother’s Day” with this cute froggie photo frame.
Designed By: Annabelle Keller, SCD,
CPD
Typical Project Completion Time: 1-2 hours
(does not include drying time)
Supply List:
STYROFOAM* Brand Products:
- Sheet, 1/2″ x 12″ x 36″
- Ball, 1″
Other Materials:
- Acrylic craft paint: lime green, dark green
- Varnish, matte finish
- Toothpick, one
- Frog eyes, 16mm, two
- Cardstock, 3″ x 5″ green
- Serrated knife
- Old candle
- Wire cutters
- Scissors
- Pencil
- Paintbrush
- Thick, white craft glue or low temperature glue gun and glue sticks
- Download
frog frame pattern (28K pdf)
Instructions:
1. Trace patterns on foam sheet. Wax knife blade with old candle and cut out foam pieces. Sand rough edges with a scrap piece of foam. Cut foam ball in half.
2. Referring to photo for placement, glue legs to back of frog. Break toothpick in half. Glue half balls to top of frog for eyes, inserting 1/2 toothpick into edge of ball and then into edge of frog; cut side of ball faces forward.
3. Paint body lime green; let dry and apply second coat. Paint on dark green spots.
4. Using wire cutters, cut shanks from frog eyes. Center and glue in place on half balls.
5. Select photograph with live area 2-1/2″ wide x 2″ deep (if you would like to preserve the original photo, make a color photocopy). Using mouth pattern, cut out photo, adding 1/8″ to all sides. Glue photo to cardstock; cut out cardstock, adding 1/8″ to all sides. Center photo in mouth area and glue to back of frog.
*Trademark of The Dow Chemical Company

Leave a Reply