Last updated on July 26th, 2017 at 11:14 pm
Make these house scarf earrings in Hogwart’s colors or for your own team or club.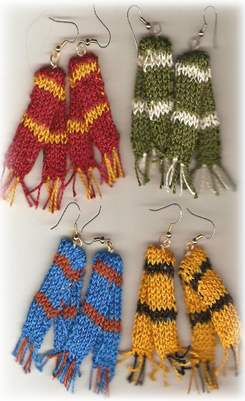
Editor’s Note: I came across this appealing little knitting pattern (designed and generously made available by Lady Felula the Forgetful) quite by accident – but immediately thought these earrings would have universal appeal, not just for Harry Potter fans, but for local sports clubs wanting to sport their colors at every opportunity. Working on such a tiny pattern can be a challenge – but obviously promises some Hoo-Rah! results.
by Lady Felula
I used the House colors, as mentioned in the Harry Potter universe, for my earrings. But any 2 color combinations could be used. You can also change the number of rows of each color. Use more or less rows and/or sets to create your own pattern. I wouldn’t do more than a total of 40 rows (my pattern is 38 rows) or the earrings will be too long and look out of proportion when worn.
Craft Supplies:
- size 0 needles
- perl cotton in 2 colors (I think mine is size 5)
- 2 pieces of lightweight interfacing approx 3/4″ x 3 1/2″
- needle abd thread
- a few straight pins
- 2 split rings or jump rings
- 2 earring hooks or studs with attached rings
- small pliers (to open hooks and add rings)
- clear nail polish
- tapestry needle to attach fringe
.
Abbreviations:
MC – 1 set is 6 rows
CC – 1 set is 2 rows
Cast on 10 stitches in any non-stretchy cast on. Starting with MC, alternate sets until you have 5 sets of MC. Bind off – use a non-stretchy bind off. Cut perl cotton, leaving a tail long enough to sew the scarf’s long sides together. You’ll close the short sides with fringe.
Fold 1 piece of interfacing in half. It should fit nicely inside the folded scarf. If not, trim it to fit. It doesn’t have to go all the way to each end. It’s used to give the scarf some stability and to give you something to sew on when you finish the scarf.
Using the pins, carefully match the stripes and pin through both sides of the scarf to hold it closed while you sew it shut. I used a simple running stitch up the side, then knotted off & pushed the tail inside the scarf. Be sure you enclose all the tails & edges inside so the construction doesn’t show.
I added fringe in both colors, alternating MC-CC-MC-CC-MC; and using the perl cotton. If you have matching shades of embroidery floss, that would give you a softer fringe, and you might be able to add more fringe than I could.
Fold the scarf in half at an angle. Place your first stitch into the scarf with your needle and thread about 1/2″ down from the center top. Be sure you do not split any of the perl cotton. Your knot should hide down underneath the scarf stitches next to the interfacing. Take one or two stitches to hold the scarf at an angle. Always go between the stitches of the scarf, never over or through them. This way, your stitches won’t show on the scarf. Slip the needle back up to the folded edge of the scarf. You can carefully stitch across the top edge or not. Do not cut your thread yet.
Now add your findings. First, open the loop at the bottom of the hook, slip the split ring on, and close the loop. You can use jump rings, but they are more likely to open when you don’t want them to. You can use a stud finding with a loop on it for hanging, but you’ll need to slip the stud loop onto the split ring because those loops usually don’t open, and if you do open one, you weaken it seriously.
Once your hook or stud is on the split ring, place the split ring at the center top of your scarf. Be sure the side you like best is facing front, and sew the ring onto the scarf with 2 or 3 stitches. Knot off, being careful the knot slides up right next to the thread. Using the tip of a straight pin, place a tiny dot of nail polish on the thread to lock the knot. Be careful – try not to get any on the perl cotton as the polish can cause a color change as well as creating a hard spot when it dries. You want that on the knot, not on your scarf.
Notes:
Be very careful when changing from MC to CC that you don’t pull hard on the CC. If you don’t leave a bit of slack on the edge of the scarf, you won’t be able to sew the sides together later.
If you use anything smaller than size 5 perl cotton, you might want to use smaller needles. I chose to use a needle size that would be available to anyone. I normally use some needles I made myself from 12 gauge florist wire by cutting 2 lengths of wire & gluing a large bead to one end. You’ll want to smooth the working end with an emery board or something similar so the cotton won’t catch on it.
You could try using embroidery floss; but remember, it has 6 individual strands and will be much harder to work with. There are a lot more colors available in it, though. You know your own abilities, so try it if you have the patience.

Leave a Reply