Last updated on June 17th, 2016 at 11:10 pm
How to Make a Craft Foam Book Cover
Craft foam comes in all kinds of vivid colors, with glitter or metallic looks also available. This cover will be glued to the cover of the book inside, so it is most suitable for note books, address books, diaries or photo albums.
Project Supplies:
Note Book
Sheet of Craft Foam (large enough to cover your book with an additional 3 inches all around)
Craft Foam Scraps
Rubber Stamp and ink (optional)
Ribbon
2 Eyelet connectors or Velcro Piece
Tacky Glue
Project Instructions:
These little book covers are easy, inexpensive and can be made to fit all sizes of books. They also offer a great protective cover for really inexpensive note pads or books.
You need to make a template to fit your note book. To do this, place your book on a sheet of paper, then:
1) trace around the top, right and bottom (referring to direction of note book as shown in diagram).
2. Carefully turn your book to the left, and trace the top, bottom and left side to your paper. You now have a rectangle shape.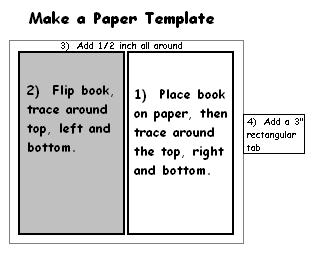
3. Add an additional 1/2 inch all around.
4. To make the little flip closure, draw another rectangle shape at the centre right of your note book template. This tab will need to extend at least three inches out from the edge of your note book cover template. Now, cut around your paper template.
Add an Eyelet or Velcro Attachment
If you decide to use eyelet connectors (they come with the tool to attach), you need to add these now.
Punch a hole into the foam at the flap end centre (refer to diagram and photo) and attach your eyelet as instructed by the manufacturer. Turn your flap up over the front of the book cover and mark the front cover of the foam for placement of the second eyelet which will be placed directly behind the first eyelet on the front cover. Attach this eyelet.
A good alternative to using the eyelets is simply a piece of self adhesive velcro. If you use velcro, just attach it the inside of the flap and the front cover, lining up the two pieces.
Add Decorative Pieces
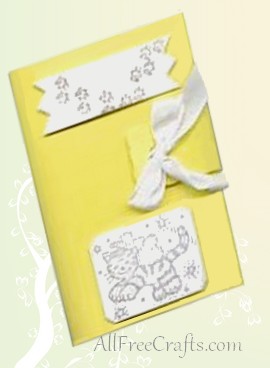
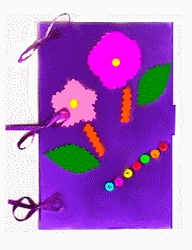
Cut a couple of decorative pieces of craft foam to place on the front of your cover. I used a rubber stamp with copper coloured ink to create the kitty and the kitty footprints on the top banner. You could write your name or the type of book that will be inserted or simply draw pictures with markers.
Glue your decorative foam pieces to the front cover and allow the glue to dry.
Glue to Book Cover
Once your glue is dry, apply glue to the front and back covers of your note book. Place your note book inside the cover, lining up all the edges evenly and press to secure. I left my telephone book on top of the cover until the glue set.
To attach the ribbon, I folded a strand of ribbon in half, tied a large knot at the fold and fed it through the eyelet holes from the inside cover to the outside of the flap closure and then tied a bow. There are many types of closures you can use for this and the easiest is a velcro strip. If you use a velcro strip, you can still glue a little bow on the top of the flap for a little extra decoration.
The possibilities are endless in how you can decorate these covers. You can use them for address books, garden journals, diaries and so many other books. Have fun with them.
Copyright © 1999-2014 Susan Spatone All rights reserved. Published with permission from CraftAtHome.com

Leave a Reply