Last updated on September 6th, 2015 at 01:16 am
Designed by Debra Quartermain
Typical Project Completion Time: 2-4 hours
(does not include drying time)
MATERIALS NEEDED:
STYROFOAM* Brand Foam:
Balls: 4″, one; 2-1/2″, two; 1″, one
Egg, 2-1/2″
Other Materials:
Felt: light brown plush, 1/6 yd.; off-white plush, 4″ x 6″; orange, 9″ x 12″ sheets, two; dark brown, 3″ square; moss green, 2″ square
Dark brown embroidery floss
Black beads, 6mm, two
Natural wooden buttons, 1/2″, two
Serrated knife
Candle stub or paraffin
Fine-line black permanent marker
Pencil and Ruler
Compass or circle template
Scissors and Embroidery needle
Extra-long straight pins
Low-temp glue gun and glue sticks
Tracing paper
Off-white upholstery thread (optional)
Powdered cosmetic blush (optional)
INSTRUCTIONS:
1. Wax serrated knife with candle stub or paraffin. Measure and cut 1″-thick slice from top of 4″ foam ball (pumpkin top); rest of ball becomes pumpkin suit. Cut upper third from one 2-1/2″ foam ball (upper body); cut remainder of ball in half (feet). Cut 1″ ball in half (paws). Cut egg in half lengthwise (arms).
2. Use fingers to slightly flatten one side of remaining 2-1/2″ foam ball (head). Note: For ease in assembly, place foam shapes in proper order – from pumpkin top down to feet – on work surface.
3. Cut patterns from felt as indicated. In addition, cut 1/2″ x 2″ strip from dark brown felt (stem) and two 1/2″ x 5″ strips from orange felt (pumpkin straps).
4. Use compass to draw following circles on wrong side of light brown plush felt: 6″ (head); three 5″ (feet/upper body); four 2″ (soles/paws). Draw 3″ circle (muzzle) on wrong side of off-white plush felt. Draw following circles on orange felt: 9″ (pumpkin); 5″ (pumpkin top); 3″ (pumpkin top base). Cut out circles and place near corresponding foam shapes.
5. Place arms flat side down on wrong side of light brown plush felt; draw line around each arm, 1″ beyond foam edges. Cut out.
6. Cover foam shapes with corresponding felt pieces. Center foam shape, rounded side down, on felt. Bring felt up to flat side of foam shape. Pin felt at four opposite points; gather excess between pins. Glue felt to foam; let dry. Remove pins. Glue soles to feet and felt base to pumpkin top. Note: Alternate method is to use upholstery thread to sew gathering stitch close to edge of felt circles; tightly pull thread to gather felt around foam shapes and knot to secure.
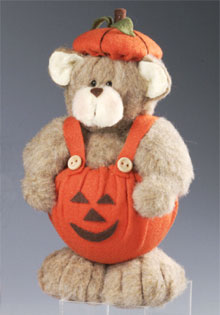
7. Sew gathering stitch close to edge of felt muzzle. Tightly pull thread to gather; knot to secure. Flatten muzzle, with gathers at center back. Tie brown embroidery floss around center of muzzle; knot at back. Apply small amount powdered blush to muzzle if desired. Glue muzzle to head, and nose to muzzle, as shown.
8. Use tip of scissors to poke two eye holes through felt above muzzle. Glue 6mm beads into holes.
9. With wrong sides together, glue one off-white and one light brown piece together for each ear. Glue ears, slightly cupped, to head.
10. Thread needle with six strands embroidery floss. To create “toes,” bring needle up through foot to one side, then take thread down over top of foot to bottom again. Repeat, bringing needle up at center of foot. Repeat once more on other side. Secure thread at bottom of foot.
11. Using photo as guide, glue face pieces to pumpkin. Glue upper body to top of pumpkin. Glue feet, rounded side up, to bottom of pumpkin. Glue head and arms to body. Glue paws to ends of arms.
12. Glue one end of straps to front of pumpkin as shown. Bring straps over shoulders; overlap ends and glue at center back of pumpkin. Glue buttons to straps.
13. Thread needle with three strands embroidery floss. Secure needle at center bottom of pumpkin top. Wrap floss over top, along center line and back to bottom. Repeat twice more, dividing pumpkin top into sixths; knot floss to secure. Roll felt stem into cylinder; glue to center top. Glue leaf to each side of stem. Glue pumpkin top to head.
*Trademark of The Dow Chemical Company.
Project reprinted courtesy of The Dow Chemical Company, Manufacturer of Genuine STYROFOAM(R) Brand Foam.

Leave a Reply