Last updated on February 21st, 2016 at 12:18 am
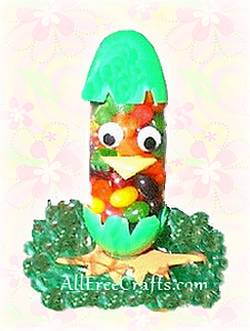
 Turn an ordinary plastic Easter egg into a jelly bean chick with these easy steps.
By Twila Lenoir and Jane Lake
Craft Supplies:
- refillable plastic eggs
- tubular plastic candy bag
- jelly beans
- craft fun foam in yellow and orange
- 12mm goggle eyes
- wire cutters or tin snips
- soda bottle cap (optional)
- twist tie
Project Instructions:
1. Start by cutting triangles all around the two egg shapes. You may also have to cut off a tab that some of the new eggs have on them.
2. Take the candy bag and fill with jelly beans. I had to resize my bags – I cut the bags in half, length wise, and ran a stream of hot glue up the side to create a tube shaped bag. The hot glue did not melt the bag, and the glue doesn’t come in contact with the jelly beans. Add the jelly beans and use the twist tie to close the bag at the top.
3. Cut out two different size triangles for the beak in yellow fun foam.
4. Look at the photo to get an idea of the shape of the chick’s feet. Draw them as one piece, not two separate feet, on orange craft fun foam. Cut out this shape and glue to the bottom of the egg. You may have to add a heavy piece of cardboard to the bottom of the feet, or an orange soda bottle cap which I have done, so that when you add the jelly bean bag, it doesn’t fall over.
5. Glue the bottom of the bag inside the bottom egg half and glue the top of the egg half on the top of the bag.
6. Glue on the goggle eyes and lastly, position the yellow beak, gluing on the larger yellow triangle first and then the smaller triangle under the larger one. When the kids are ready to eat the jelly beans, you can cut a slit in the bag.


Leave a Reply