Last updated on February 21st, 2016 at 11:38 pm
How to Make a Nutty Bunny
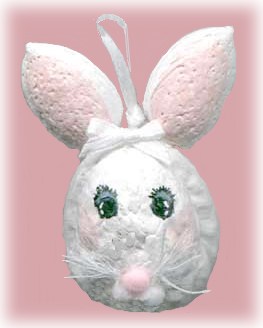
Here’s an adorable Easter nutty bunny to make from natural materials, using a walnut and two almonds.
Craft Supplies:
- 2 Almonds
- 1 Walnut
- White Paint
- Pink Paint
- Blue Paint
- Black Paint
- 2 White Pompoms
- 1 Pink Pompom
- White Ribbon
- Tacky Glue (hot glue for big kids)
.
Project Instructions:
Paint a walnut and two almonds in white. Allow the paint to dry.
Glue the almonds onto the walnut as the ears of the bunny. You may need to sand the bottom of the almonds for a perfect fit. Simply rub the bottom of the almond along a piece of 220 grit sand paper and test for fitting.
Paint the centre of the ears pink.
Paint the eyes by first making a circle of blue paint and allowing it to dry. On top of the blue circle, now paint a small circle of black paint and allow it to dry as well.
Add a couple of dots of white paint to add highlights to the top of the black eye pupils.
Paint several teeny lines for eyelashes with black paint. Our photo shows you clearly how the eyes can look if you follow these painting directions.
Cut a small piece of ribbon into little strips to use for whiskers and glue these to the face (you could also use small strands of white embroidery thread).
Glue the pompoms together in a triangle shape and attach them to the face, on top of the whiskers.
Paint rosy cheeks with pink paint. Although you can’t see it in the photo, I also painted teeny teeth in pink paint, just below the pompoms at the bottom, with the paint extending into the white pompoms.
To finish your nutty bunny, just glue a small loop of ribbon and a bow to the top centre of the head.
Copyright © 1999-2016Susan Spatone.



Leave a Reply