Last updated on February 22nd, 2020 at 03:08 pm

Here’s how to make a terra cotta or clay pot bunny with irresistible hand-sculpted clay bunny features.
Supplies:
- 3 small clay pots (choice of size and the pots must all have centre holes at the bottom)
- Sculpey, Fimo or similar clay
- Ribbon Scraps
- Wire (coat hanger piece works well for this)
- Hot glue or super glue
- Acrylic
Project Instructions:
You will need to refer to the photos below in order to complete this clay pot bunny craft.
Paint your clay pots white and allow the paint to dry.
I have included photos of the clay parts separated, so the instructions will be a little clearer. I’ve also shown the different angles of the feet and hands, so that you have a guide in creating these parts. These really are quite easy to make.
You can use all the colours of clay to make these, but I painted the clay after, rather than using all different colours.
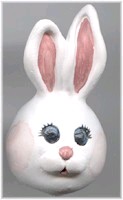
To make the face, roll your clay in a circle and then flatten the circle a little and create a little more of an oval shape, rather than a round shape.
Make ears and attach to the top of the face by gently smoothing the clay over the joining areas. Create three little flat circles to create the mouth area and press onto the face. Cut small circle impressions at the eye area and a small hole for the mouth.
To make the feet and hands, simply roll out a strip of clay (the thickness will depend on the size of your clay pots) and flatten slightly, then forming shapes for the hands and feet (referring to photos).
Before setting your clay, you will need to poke some holes. Poke a hole from the bottom of the face, up through the entire face, coming out just behind the ears. This hole will act as your hanger, as well as hold the feet in place.
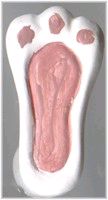
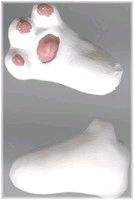
Poke small holes in both the hands at the top arm area. The ribbon will be inserted in here to hold the hands in place.
Referring to the photo, create two wire pieces to act as legs for your bunny.
You can paint the wires as I did, or leave them as they are. The wire length should be as long as your largest clay pot is deep, plus a little extra to poke into the feet. Loop your wire at the top (this will be the section that attaches to ribbon, holding the feet in place. Poke the straight end of your wire into the bunny feet, to create an impression that will fit perfectly. Don’t leave this wire in the feet, only create an impression. You don’t want the wire going through the heat setting process of your clay.
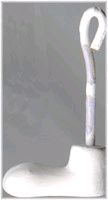
Once your clay is set, glue the wire into these holes on the feet. Keep referring to the photos for more direction.
To assemble your bunny, start with the face and feed a piece of ribbon through the top of the head, down to the bottom (creating a loop at the top and having two ends of ribbon at the bottom). Feed the two ends through the large clay pot and tie one ribbon strand around each leg. The bunny legs are now attached.
Glue a ribbon end into one hand hole. Feed this ribbon strand through the center, inside of one small clay pot and through the outside center, to the inside of the second clay pot. Glue the end of the ribbon into the second hand hole. The ribbon between the two small pots will need to be long enough to hang freely over the center pot.
Insert the centre ribbon section that connects the two small pots under the head and across the bottom of the large clay pot. Glue this ribbon and the head together, to the large clay pot bottom.
Tie a bow around the neck (this will hide any overspill of glue). I painted my pots white, then used a translucent purple paint and then with a dark purple, I splattered paint over the pots.
All of the bunny parts were painted white and then the painted detail was added.
Be sure to follow your manufacturer instructions for setting and preparing your clay.
Copyright © 1999-2020 Susan Spatone All rights reserved. Published with permission from CraftAtHome.com



Leave a Reply