Last updated on June 29th, 2018 at 12:26 am
If you have some wooden plant marker sticks left over from your garden planting, then this craft will be easy for you; if not, you can use regular craft sticks or pick up some small, inexpensive, pointed plant stakes at craft stores and garden centers. For the base, just recycle a styrofoam or plastic container lid.
Supplies:
- Wood plant label sticks (garden centres, craft shops)
- Scrap ribbon
- Hot glue (tacky glue for children)
- Styrofoam container lid or plastic container lid
- Paper twist (chenille stems can also be used)
- White paint
.
Instructions:
For this project, I used the lid of a Styrofoam soup container (take out food), but you can use any sort of container lid or the bottom of a small box. The only requirement is that it has a slight rim, so that you can glue your sticks to it. The sticks that I used are small plant label sticks (I like the picket fence look), but you can use regular craft sticks for this project.
Paint your sticks white and paint your container. Allow the paint to dry. You can paint the sticks after applying them to the base, but it’s a little more difficult to get between the sticks, once they are assembled. When I painted my sticks, I painted half the stick, then stuck it in a piece of floral foam to dry before painting the other half.
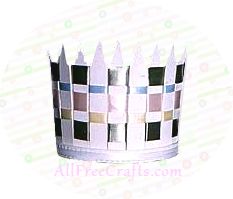 Glue a small piece of ribbon around the outside of the container lid. Glue your sticks against the inside rim of the container. It’s a good idea to place your sticks first to make sure you have enough and you’ll be able to decide how much of a gap to leave between the sticks, in order that they be placed evenly around the lid. Allow the glue to dry completely before continuing. You will be tugging a little at the sticks for the next step and you don’t want them to start popping out.
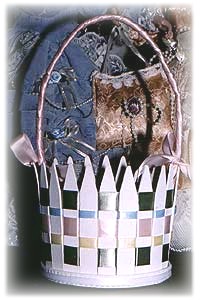
Weave ribbon scraps in and out of the sticks, as shown in our sample basket. Glue the two ends of the ribbon together on the inside of the basket to secure. Continue weaving ribbons until you reach just below the top of the basket, securing each of the ribbon ends together.
For the handle, I used a piece of paper twist and wrapped it with a pink ribbon. It isn’t necessary to wrap the handle, but it adds a little to the finished basket.
To wrap the handle, glue your ribbon at one end of the paper twist, wind your ribbon around the entire length of the twist and secure at the other end with glue. Glue your handle in place on the inside bottom of the basket and extending the twist up the sides (securing the sides with glue as well). Hot glue is recommended for securing the handle, as you want this handle to be strong enough to hold all of your goodies. Pipe cleaners (chenille stems) can also be used for this, but be sure to secure them well.
Tie a bow at the top of the basket around each side of the handle and you are all done.
Copyright © 1999-2018 Susan Spatone

Leave a Reply