Last updated on January 25th, 2023 at 07:12 pm

Editor’s Note: I first heard of The Butterfly Project, organized by the Holocaust Museum of Houston, Texas in 2018, when I found this pretty crocheted butterfly pattern by the talented designer of The Sunroom on Ravelry. She kindly allowed me to share the pattern here with you.
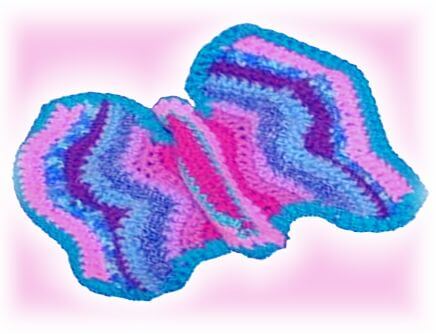
This butterfly pattern is relatively simple but you will need to work in reverse for the opposite wings, otherwise they will both be the wrong way around, hopefully this makes sense. One of the wings will be the correct way up and the opposite one will be upside down, if you don’t work in reverse.
You’ll find this crocheted butterfly is a great stash buster and you can use a variety of oddments to make it up.
Materials:
- 10 different colours in very small amounts – DK was used here. (approx. 25g weight)
- C1 – Dusky Pink
- C2 – Aqua
- C3 – Baby Pink
- C4 – Mauve
- C5 – Lavender
- C6 – Blue Tweed
- C7 – China Blue
- C8 – Augergine
- C9 – Aqua Mix
- C10 – Jade
- Hook 4.5mm US G or 6/7
- Darning Needle
- Stitch marker or safety pin (if required)
Stitches:
Ch – chain
SC- throughout (UK) dc – throughout (US)
SL ST – slip stitch
inc – Increase – by crocheting 2 stitches into 1 st.
dec – Decrease – by crocheting two Sts together.

Crocheted Butterfly Pattern
Body
The body of the butterfly is worked in a continuous oval, work around the oval.
Using C1 – Chain 15, turn to begin.
1St Round – SC into second ST in chain, SC x 12, SC three times into next ST, x12, SC twice into next ST.
2nd Round – Changer Colour C2, place a stitch marker in at this point, if required. SC into next ST, SC twice into the next ST, SC x 11, SC twice into the next ST, SC x2, SC twice into next ST, SC x11, SC twice into next ST, SC x2
3rd Round – Change colour C3, SC twice into next ST, SC x13, SC twice into next ST, SC twice into next ST, SC x 14, SC twice into next ST 2
4th Round – twice into the next ST, SC x15, Sl ST, Fasten off. Leave a tail and sew in.,
Wings

Both wings are alike. Begin with the right side wing and work in colour changes as shown. When you complete 1st colour on the right hand wing then work that row/s on the left hand side in reverse. For example – Rows 1 & 2 same colour. Once complete transfer yarn to opposite sides and work Rows 1 & 2 reading the stitches in reverse order. This seems complicated but isn’t really once he pattern starts to take shape.
Row 1 – Join new colour of yarn C1, on either side. SC x 14, Ch 1, turn
Row 2 – SC x 4, SC twice into next two ST (inc.), SC x3, Skip next ST and SC 2nd ST (dec.), SC x2, double SC into next ST (inc). 1 SC,
Now working on the opposite wing fasten on colour 1 and work the above rows in reverse.
Row 3 – CC C4, Ch 1, SC x 10, SC into second ST, (dec). SC x3, SC twice into final stitch (inc), turn
Row 4 – CH 1, SC x 5, (dec) 1 (SC into second ST), SC x 4, (Inc) SC twice into next two stitches, SC x 2 Ch 1, turn
Now working on the opposite wing fasten on colour 4 and work the above rows in reverse.
Row 5 – CC C5, SC twice into next ST (inc), SC x 3, SC twice into next ST (inc), SC, SC twice into next ST (inc), SC x 4, SC twice into final ST (inc), turn.
Row 6 – CC C6, SC twice into next 3 Sts (inc), SC x3, (dec) x 2, SC twice into next four Sts (inc), SC x4, SC twice into next ST (inc), Chain 1 turn.
Now working on the opposite wing fasten on colours 5 and then 6 and work the above rows in reverse.
Row 7 – SC x 16, (dec) 1, SC x 8, SC three times into next ST (inc), Ch, Turn.
Row 8 – CC C7 – SC X7, SC twice into next two Sts (inc), SC X2, (dec) 1, SC X3, SC twice into next five Sts (inc). SC X7, SC twice into next ST (inc), Ch, turn.
Now working on the opposite wing fasten on colour 7 and the 8 work the above rows in reverse.
Row 9 – SC x 20, (dec) x 2, SC X11, Ch1, turn
Row 10 – CC C8 – SC X11, SC twice into the next two Sts (inc), SC X7, SC twice into each of the following five Sts (inc), SC X6, Ch1, turn
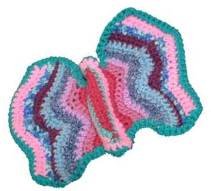
Now working on the opposite wing fasten on colours 8 and then 9 work the above rows in reverse.
Row 11 – SC second ST in (dec), SC X21, (dec) 1, SC X1, Slip St, bind off – mid wing.
Row 12 – Join new CC C9 at bottom of the wing – SC second ST in, SC X10, (dec) x 2, SC X20, Ch 1, turn
Now working on the opposite wing fasten on colour 4 and work the above rows in reverse.
Row 13 – SC second ST in (dec), SC X18, (dec) 1, SC 1, SL ST, Bind off
Row 14 – Join CC C3, Ch 1, SC into second ST (dec), SC x 21, (dec) 1, SC X5, Ch1, turn
Row 15 – SC x4, (dec) 1, SC X21, Bind off.
Now working on the opposite wing fasten on colours 9 then 3 and work the above rows in reverse.
Before completing last row sew all ends in.
Row 16 – CC C10, SC around the entire butterfly use SC twice into a stitch at all turns on the wings.
This pattern is offered and made available for personal use only.
AllFreeCrafts is reader supported! Many supplies are found at thrift stores so try that first! However, if you buy from an affiliate link on this site, I earn a commission at no extra cost to you. As an Amazon associate, I earn from qualifying purchases. This has kept AllFreeCrafts.com online since 2002. Thank you!
You may also wish to check out Gloria’s Crocheted Butterfly, shown at left; another free butterfly crocheted pattern, completed in just two colors of yarn, that is quick to make and very pretty.
If butterflies are your passion, or you know someone who loves them, consider making a Dollar Bill Butterfly , Butterfly Note Holders from Paper Scraps, or letting your kids make a yarn butterfly from this cute Spool Knit Butterfly Kit (Amazon link).



Leave a Reply