Last updated on December 13th, 2024 at 12:19 am
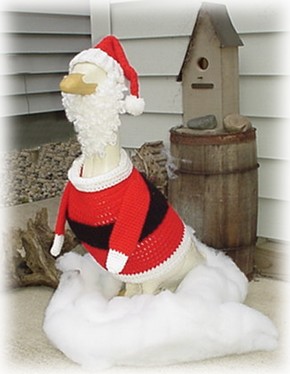
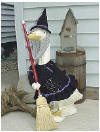
This festive crocheted Santa pattern is perfect to dress a decorative lawn goose for the Christmas season.
Materials needed:
4 ply yarn Red, White and Red Heart
Baby Clouds White for the beard
G hook
GARDEN GOOSE SANTA PATTERN
Hat Brim: cuff, ch 12, 1 sc in 2nd st from the hook, 1 sc in 10 sts, turn Work in the back loops only throughout the hat cuff,
2: ch 1, 1 sc in each st, turn
3-38: ch 1, repeat row 2, sl st row 1 and row 38 tog.
Hat: red, start at joining seam of hat1 sl st in the end of the first row, you will be working along the edge.
1: 1 sc in end of each row, 38 sts, join with a sl stin first st.
2-4: ch 1, sc in each st, join
5: ch 1 , 2 scs tog, ( 1 sc in 4 sts, 2 sc tog ) 6 times join
6- 7: ch 2, 1 hdc in each st, join (31 sts)
8: ch 2, ( 1 hdc in 4 sts, 2 hdc tog) 5 times, join
9: ch 2, 1 hdc in each st, join
10: ( ch 2, 1 hdc in 4 sts, 2 hdc tog ) 4 times, 1 hdc in 2 sts, join
11-12: ch 2, 1 hdc in each st.join
13: ch 2, ( 2 hdc tog, 1 hdc in sts ) 4 times, 2 hdc tog, 1 hdc in 1 st.
14-15: 1 hdc in each st, join
16: ( 2 hdc tog, 1 hdc in 2 sts) 4 times, 2 hdc tog.join
17-19 : 1 hdc in each st
20: ( 2 hdc tog, 1 hdc in 1 st) 4 times, 12 hdc in last st, join
21-22; ch 2, 1 hdc in each st, join
23: ch 2,( 2 tog,) 4 times, 1 hdc in last st.
24: ch 2, 1 hdc in each st
25: ch 2,( 2 hdc tog,) 2 times, 1 hdc in last st. fasten off.
TASSEL: wrap yarn around 4 fingers 50 times or a 3 in piece of cardboard, slide off, tie tightly in center, trim the edge and fluff, sew or tie onto top of hat.
BELT: Black yarn, ch 10, 1 sc in 2nd st from the hook, turn
2-92: ch 1, 1 sc in 9 sts, turn
93: 1 sc in 3 sts, 1 hdc in 3 sts, 1 dc in 3 sts, sl st the ends of row 1 & 93 together, fasten off.
BEARD: curly yarn, I used Red Heart Baby Clouds
1: ch 20, 1 sc in 7 sts, 2 sc in 7 sts, 2 sc in 1 st, 1 sc in 4 sts, 2 sc in 1 st,1 sc in 7 sts, ch 1 turn
2: 1 double loop stitch in each st.turn
3: sl st in 2 sts, 1 sc in 6 sts, 2 sc in 1 st, 1 sc in 4 sts, 1 sc in 6 sts, turn
4: double loop st in each st, turn
5: sl st in 3 sts, 1 sc in 5 sts, 2 sc in 1 st, 1 sc in 4 sts, 2 sc in 1 st, 1 sc in 5 sts. turn
6: 1 double loop st in each st, turn 7: sl st in 2 st, 1 sc in 3 sts, 2 sc in 1 st, 1 sc in 4 sts, 2 sc in 1 st, 1 sc in 3 sts, turn
7: sl st in 2 sts, 1 sc in 3 sts, 2 sc in 1 st, 1 sc in 4 sts, 1 sc in 3 sts, turn
8: 1 double loop st in each st, turn
9: sl st in 1 st, 1 sc in 6 sts, turn
10: 1 double loop st in each st, turn
11: sl st in 1 st, sc in 4 sts, turn
12: 1 double loop st in each st, fasten off
COLLAR: attach white yarn at center back of neck, ch 2,
1: 1 hdc in same space and in each st, join with a sl st in the first st.
2-5: ch 2, 1 hdc in each st, join fasten off.
Weave in all loose ends.
Coat: ch 37, sl st in the first st to form a ring, keep the chain sts straight,
1: ch 3, 1 dc in 4 sts, 2 dc in 1 st, ( 1 dc in 5 sts, 2 dc in 1 st) 6 times, 1 dc in 1 st, join with sl st in top of the chain, ( join in this manner throughout un less otherwise stated ) ch 3
2: 1 dc in each st, join
3: ch 3, 1 dc in 5 sts, ( 1 dc in 6 sts, 2 dc in 1 st) 5 times, 1 dc in 1 st, join
4: ch 3, 1 dc in each st, join.
5: ch 3,1 dc in 4 sts, 2 dc in 1 st, ( 1 dc in 5 sts, 2 dc in 1 sts ) 7 times, 1 dc in 2 sts, join
6: ch 3, 1 dc in each st, join
7: ch 3, 1 dc in 4 sts, 2 dc in 1 st, ( 1 dc in 5 sts, 2 dc in 1 st) 8 times, 1 dc in 3 sts, join
8: ch 3, 1 dc in each st, join
9: ch 3 , 1 dc in 4 sts, 2 dc in 1 st, ( 1 dc in 5 sts, 2 dc in 1 st ) 10 times
10- 20: ch 3 , 1 dc in each st, join
Sleeves: make 2, G hook, and white yarn, ch 3, sl st to form a ring.2: ( 2 sc in 1 st, 1 sc in 1 st) 4 times 12 sts
3-7: 1 sc in each st.
8: change to Red yarn and H hook ( 2 sc in 1 st, 1 sc in 2 sts) repeat 4 times
9-31: 1 sc in each st
32: 2 sc tog 8 times, sl st in 1 st, fasten off.
Position the sleeve on the coat and sew into place or use a brass paper fastener to hold in place, this allows you to move the arms up and down.
Original Pattern by crochet designer: Mary Sue Ottinger


The first step for the collar says to attach it to the back of the neck. What neck? I’ve done the hat and beard but nothing with a neck.
That’s a very good question, Wendy, and unfortunately I can’t answer because I’m not the designer of this older pattern.
I will try to find out, and post the answer for you if I find one. Meanwhile, if anyone else has ideas on this, please chime in!
I did the coat first. Then did the collar. You can attach it right at the top in the middle ( where row joins ).
Sheila, thank you so much! That sounds simple enough. I really appreciate you taking time to share.