Last updated on September 18th, 2015 at 11:25 pm
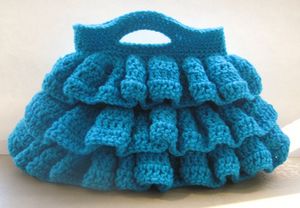 Bella Ruffled Bag – Free Crochet Pattern
Sometimes you come across a pattern that just seems to call to you; this is what happened to me when I saw this delicious pattern for a ruffled bag, designed by the fantastic crochet pattern designer at CrochetDreamz.
With her permission, I am honored to share the free crochet pattern with you here. Please visit CrochetDreamz for more stunning free patterns, as well as reasonably priced original designs for women and babies. You’ll be glad you went.
Materials:
1. Worsted weight yarn ( size 4 Medium), also known as Afghan or Aran Yarn.
I used color Aqua from Vanna’s choice.
2. Hooks H (5 mm) and G(4.25 mm)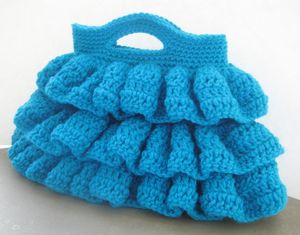
Yardage
Around 510 Yards. I used 3 skeins of Vanna’s Choice.
Gauge
With H Hook, 14 st X 9 hdc Rows = 4 inches
Size
13 inches wide at the base and 9 inches tall including the handle. It would be the size of an oversized clutch.
Stitch Abbreviations
Pattern is in standard American terms.US to UK conversion chart can be found online.
sc- single crochet
sl st- slip stitch
hdc- half double crochet
dc -double crochet
ch- chain
Stitch Explanation
1. hdc2tog : [Yarn over, insert hook into next stitch and pull up a loop] twice to get 5 loops on the hook, yarn over and pull through all 5 loops on the hook. Note: hdc2tog is s decrease worked across two stitches joining two stitches in to one.
2. (hdc2tog) twice : This means that you do one hdc2tog across 2 stitches and then again you do one more hdc2tog across the next 2 stitches. So you would have made a total of 2 decreases one after the other.
Note: The pictures are given at the top of each section. Please work from the written pattern and look up the pictures for reference when mentioned in the written pattern.
Making the Body of the Bag and Ruffles

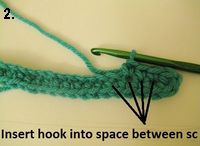
1. Work along the opposite side of foundation chain as shown by arrow.
2. Hook is inserted not into free loops of foundation chain but into gaps between sc.
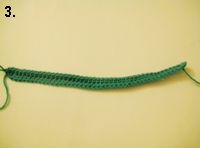
3. A long oval formed after completion of round 1.
4. After Round 3.
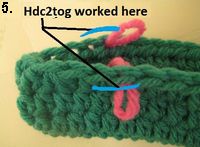
5. Mark 9 stitches in left corner symmetrically.
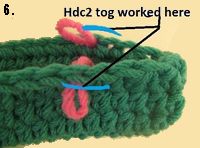
6. Right corner, do the same and work hdc2tog near the markers.
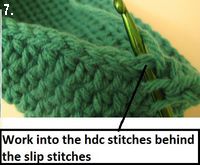
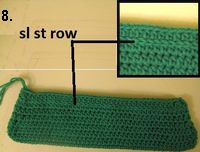
7. Shows how Round 9 is worked.
8. The slip stitch row shown enlarged. The row on top of the slip st round is Round 9.
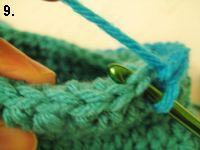
9. Fold your work to insert hook into the slip st round.
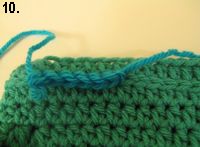
10. 1st sc round of ruffle in to sl st.
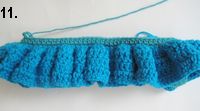
 11. Bag looks like this after first ruffle is made.
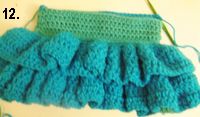
12. After second ruffle and a few more rounds.
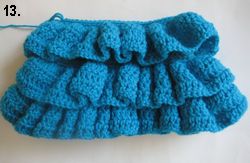
13. After adding the third ruffle.
Pattern for Body of Bag and Ruffles
Note: This bag is worked bottom up and you keep adding the ruffles as you go. The ruffles are started with a separate skein of yarn.
Chain 45
Round 1: 1 sc in 2nd chain from hook, 1 sc in each chain across, 3 sc in last chain, pivot to work along the opposite side of the foundation chain as shown in pic 1 above, 1 sc in each of the gaps between the sc stitches till the end as shown in pic 2 above, sl st to beginning ch 1; Turn. (90 St counting the slip st as a stitch too)
A long oval is formed after round 1 as shown in pic 3 above.
Round 2 & 3: Ch 2 (does not count as a stitch here and throughout), 1 hdc in same st as ch 2, 1 hdc in each stitch around, sl st to top of 1st hdc; turn.(90 st)
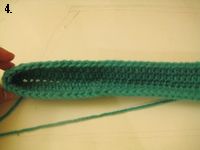
Your bag starts taking the shape of a long boat now as shown in Pic 4 above.
Note: As long as you are making the correct number of decreases in each round, you may not really have to count the stitches at the end of each round. The body of the bag tapers upwards. Mark 9 stitches symmetrically in each corner as shown in pic 5 and 6 above. The decreases are worked near the markers.
Round 4: (See Pic 5 and 6 above to see where the decreases are made): Ch 2, 1 hdc in same st as ch 2, 1 hdc in each st till one stitch is left before the marker, hdc2tog ending in marked st, 1 hdc in each st till the next marked stitch on the other end, 1 hdc2tog starting from the marked stitch, 1 hdc in each stitch till you have 1 st left before the next marker, hdc2tog ending in marked st, 1 hdc in each st till the next marker on the other end, 1 hdc2tog starting from the marked st, 1 hdc in the remaining stitches of the round, sl st to 1st hdc of the round; turn. (86 st — you made 4 decreases in this round)
Mark 11 stitches symmetrically in each corner before the next round just like you did for Round 4. You will be working two hdc2tog near each marker.
Round 5: Ch 2, 1 hdc in same st as ch 2, 1 hdc in each st till 3 stitches left before the marker, (hdc2tog) twice ending in marked st, 1 hdc in each st till the next marked stitch on the other end, (hdc2tog) twice starting from the marked stitch, 1 hdc in each stitch till you have 3 st left before the next marker, (hdc2tog) twice ending in marked st, 1 hdc in each st till the next marker on the other end, ( hdc2tog) twice starting from the marked st, 1 hdc in the remaining stitches of the round, sl st to 1st hdc of the round; turn. (78 st – you made 8 decreases in this round)
Round 6 and 7: Ch 2 (does not count as a stitch here and throughout), 1 hdc in same st as ch 2, 1 hdc in each stitch around, sl st to top of 1st hdc; turn and do not fasten off. (78 st)
Round 8: With a fresh skein of yarn, do a round of slip stitch (you can start anywhere) , making 1 sl st in to each st of the previous round and ending with a sl st into the first sl st. You shouldn’t make the slip stitches too tight and can switch to the next size hook just for the slip st round if you wish. Do not fasten off, we will later make ruffles in to these slip stitches with this skein of yarn. (78 Sl st)
Round 9: Mark 11 stitches on both ends like before and Repeat Round 5 with 8 decreases but you work into the the hdc stitches of the round before the slip stitch round as shown in Pic 7 and 8 above.
The sl stitches are the stitches you see stuck on the side. (70 st)
Now proceed to make the ruffle in to the slip stitch round.
First Ruffle
Note: You can fold your work as shown in pic 9 and 10 above to work the first round into the slip stitches comfortably.
Round 1 of Ruffle: Continuing with the same skein of yarn that was used for the slip stitch round, ch 1 (not counted as a stitch) , 1 sc in same st as ch 1, 1 sc in each slip stitch of the round, sl st to 1 st sc; turn. (78 sc)
Round 2 of Ruffle: Ch 3 (counted as a stitch), 2 dc in same st as ch 3, 3 dc in each sc stitch around, sl st to top of beginning chain 3; turn. (234 st)
Round 3 of Ruffle: Ch 3 (counted as a stitch), 1 dc in each stitch around, sl st to top of beginning chain 3; turn. (234 st)

Round 4 of Ruffle: Ch 3 (counted as a stitch), 1 dc in each stitch around, sl st to top of beginning chain 3; Fasten off. (234 st)
You can see the how your bag will look after first ruffle in pic 11 (above and at left).
Proceed to Round 10 Below
Round 10 : Mark 9 stitches symmetrically in the two corners and repeat Round 4 with 4 decreases. (66 st)
Round 11 : : Ch 2 ( does not count as a stitch here and throughout), 1 hdc in same st as ch 2, 1 hdc in each stitch around, sl st to top of 1st hdc; turn. (66 st)
Round 12: Mark 9 stitches symmetrically in the two corners and repeat Round 4 with 4 decreases; turn and do not fasten off. (62 stitches)
Round 13: Make a round of slip stitch with the skein of yarn you used earlier for the first ruffle. (62 Sl st)
Round 14: Just like you did for Round 9, you work this round into the the hdc stitches of the round before the slip stitch round as follows: Ch 2 ( does not count as a stitch here and throughout), 1 hdc in same st as ch 2, 1 hdc in each stitch around, sl st to top of 1st hdc; turn and do not fasten off. (62 st)
Proceed to make the Second Ruffle as follows.
Second Ruffle (worked just like the first ruffle)
Note: You can fold your work as shown in pic 9 above to work the first round in to the slip stitches comfortably.
Round 1 of Ruffle : Continuing with the same skein of yarn that was used for the slip stitch round, ch 1 ( not counted as a stitch) , 1 sc in same st as ch 1, 1 sc in each slip stitch of the round, sl st to 1st sc; turn. (62 sc)
Round 2 of Ruffle: Ch 3 (counted as a stitch), 2 dc in same st as ch 3, 3 dc in each sc stitch around, sl st to top of beginning chain 3; turn. (186st)
Round 3 of Ruffle : Ch 3 (counted as a stitch), 1 dc in each stitch around, sl st to top of beginning chain 3; turn. (186 st)

Round 4 of Ruffle : Ch 3 (counted as a stitch), 1 dc in each stitch around, sl st to top of beginning chain 3; Fasten off. (186 st)
You can see how your bag will look after adding second ruffle in pic 12 (above and at left).
Proceed to Round 15 Below.
Round 15: Mark 9 stitches symmetrically in the two corners and repeat Round 4 with 4 decreases; turn. (58 stitches)
Round 16, 17 & 18: Ch 2 ( does not count as a stitch here and throughout), 1 hdc in same st as ch 2, 1 hdc in each stitch around, sl st to top of 1st hdc; turn and do not fasten off. (58 st)
Round 19: Make a round of slip stitch with the skein of yarn you used earlier for the second ruffle or a fresh skein of yarn. (58 sl st)
Round 20: Just like you did for Round 9, you work this round into the the hdc stitches of the round before the slip stitch round as follows: Ch 1 ( does not count as a stitch here and throughout), 1 sc in same st as ch 1, 1 sc in each stitch around, sl st to top of 1st sc; turn and do not fasten off. (58 st)
Proceed to make the Third Ruffle as follows.

Third Ruffle ( worked just like the first and second ruffle except the first round is a hdc round instead of sc).
Note: You can fold your work as shown in pic 9 (above and left) to work the first round in to the slip stitches comfortably.
Round 1 of Ruffle : Continuing with the same skein of yarn that was used for the slip stitch round, ch 2 ( not counted as a stitch) , 1 hdc in same st as ch 2, 1 hdc in each slip stitch of the round, sl st to 1st hdc; turn. (58 hdc)
Round 2 of Ruffle: Ch 3 (counted as a stitch), 2 dc in same st as ch 3, 3 dc in each sc stitch around, sl st to top of beginning chain 3; turn. (174 st)

Round 3 of Ruffle : Ch 3 (counted as a stitch), 1 dc in each stitch around, sl st to top of beginning chain 3; turn. (174 st)
Round 4 of Ruffle : Ch 3 (counted as a stitch), 1 dc in each stitch around, sl st to top of beginning chain 3; Fasten off. (174 st)
You can see how your bag looks after adding 3rd ruffle in Pic 13 (above and right).
BAG HANDLE
 14. Measure 2 ¼ inches on each side and place markers as shown.
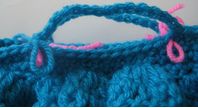

15. Chain 15 for handle when you reach the marker.
16. Work sc in to chain for bag handle.
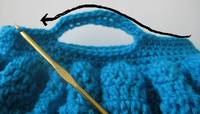
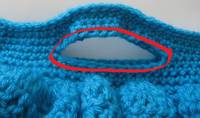
17. Continue sc round as shown.
18. Work a slip st border around as shown.
Pattern for Bag Handle
Switch to a G hook as you are going to start working the bag handle.
Round 21: ch 1 ( not counted as a stitch), 1 sc in same st as ch 1, 1 sc in each stitch of the round, sl st to 1st sc; turn. (58 st)
Place markers for the bag handle. Lay your bag flat and measure 2¼ inches from both sides and place markers as shown in pic 14 above. My markers were 3½ inches apart. You will place on both sides of the bag for 2 handles.
Round 22: Ch 1 ( not counted as a st), 1 sc in same st as ch 1, 1 sc in each stitch till the marked stitch, Ch 15, skip all the stitches between the markers, 1 sc in to the next marked stitch, 1 sc in each stitch till you reach the marked stitch on the other side of the bag, Ch 15, skip all the stitches between the markers, 1 sc in to the marked st, 1 sc in each stitch of the round , sl st to 1st sc; turn. See Pic 15 above for guidance.
Round 23: ch 1 ( not counted as a stitch) , 1 sc in same st as ch 1, 1 sc in each stitch, when you reach the chain for the handle, 1 sc in to each chain as shown in pic 16, continue doing 1 sc in each stitch or chain for the full round as shown in pic 17 above, sl st to 1st sc; turn.
Round 24 & 25: ch 1 ( not counted as a stitch) , 1 sc in same st as ch 1, 1 sc in each stitch of the round, sl st to 1st sc; turn.
Round 26: Sl st in to the next st and each st around. This is to make the handle less stretchy and to give it a better finish.
Finishing
1. Work a round of slip stitch around the handle as shown in pic 18 above and fasten off.
2. Weave in any tails remaining.
About the Contributor: Crochet Dreamz is the creative crochet blog of a stay-at-home mom who started crocheting for the love of flowers and was hooked for life.
You are free to sell items made from CrochetDreamz designs, but do not sell or distribute patterns without written permission of the author. Vist Crochet Dreamz for more free crochet designs as well as a lovely series of baby crochet patterns and women’s crochet patterns for sale at reasonable prices. Stay updated with new patterns by joining CrochetDreamz on Facebook.

Leave a Reply