Last updated on March 24th, 2025 at 11:40 pm
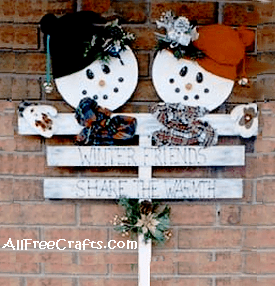
Winter Friends Wooden Stake Snowman Decoration
A great project for the beginning woodworker, this winter friends wooden stake uses simple carpentry and painting skills and will make a lovely, festive decoration for your front yard.
Craft Supplies:
Wood:
All of the wood listed below, was found at Home Depot in the section, where all the scrap cut pieces can be found, at a total cost of about $2, with some wood left over. I used pine, but most wood is suitable for this.
2 of 10 inch round disks ( I used cutting boards found at a local dollar store.You can also find round plaques at craft and hobby shops)
78 inches of 3 x 1 wood
22 inches of 2 x 1 wood
48 inches of 2 x2 wood
E6000 or Crafters Goop Glue
Hand saw or Jig saw
Paint:
White, black, red and medium blue paint (I used acrylic paints)
Exterior polyurethane or varnish
Miscellaneous:
2 Small hats and mittens (all samples purchased at a dollar store)
4 of 1 1/2 inch jingle bells
Scrap fabric, for the scarves
3 Christmas picks or Christmas florals
Yarn Scraps or shoe laces, to attach jingle bells
Orange Fimo clay (or similar product), for nose
4 of 1 1/2 inch, half egg shapes, for eyes
10 of 1/2 inch, black buttons, for mouth
Tools:
Staple Gun with staples
Wood glue
Drill and counter sink drill bit, suited to the screws used (the package of screws, usually indicates the drill bit size required)
Screws (#8 wood screws work fine, you’ll need about 16)
Paint brush (fine liner works best for adding the letters)
220 grit sandpaper
More Winter Craft Projects by Susan Spatone: Mr and Mrs Snowman Mittens, Candlecup Snowman, Bisque Snowman, Snowman Face Lightbulb.
Craft Project Instructions:
Begin by cutting your wood to the required lengths. These do not need to be exact, so don’t worry if you cut a little crooked, or a bit too short or long (within reason of course). Cut from your 3×1 a 30 inch long piece and two 24 inch long pieces.
Cut your 2×1 into two equal 11 inch pieces. Cut an angle on all four sides, at one end of your 2×2 piece of wood. This will create a pointed end, to make inserting your stake into the ground much easier.
Gently sand all of your wood pieces (including wood half egg shapes), to remove any splinters.
To make the nose, create a cone shape from clay. The cone should be about 1-3/4 inches long and about 3/4 inch at the wide end of the cone. Once you have your cone shape, flatten the wide bottom of the cone so that it can easily be attached to the wood. With your finger nail or a similar sharp object, cut small lines through the surface of the cone, to make it appear more like a carrot. Bake your clay or set the clay according to manufacturer instructions.
I like to paint all of my wood pieces before assembling them. This helps to seal all edges and seams of the wood. Paint all wood pieces white, except for the half egg shapes, that are to be painted black. Apply as many coats of paint as necessary for complete coverage, allowing each coat of paint to dry before applying the next coat.
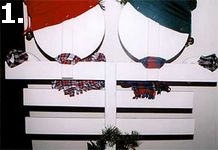
Now that all your paint is dry, you need to assemble the pieces. Referring to photo Step 1, place your 30 inch piece of wood at the flat top end of your 48 inch 2×2 piece. Pre-drill holes for the screws, to prevent the wood from splitting. If you are new to wood crafting, please be sure to drill first, then insert your screws. The odds are, that your wood will split and you’ll be very dissapointed if you skip pre-drilling. Use at least 2 screws per board in order to prevent the attached board from moving.
Leaving about a 1½ inch gap between the boards, screw your two 24 inch boards as shown in the photo. All of these boards will be screwed from the front of the piece, using a counter sink drill bit and screws. It’s also a good idea to add a little wood glue between all boards, just before you secure them with screws.
Once again, referring to photo Step 1, position the round disks along the edge of your 30 inch board. Place one of the 11 inch 2×1 pieces so that it covers the 3×1 board and the round disk. Pre-drill, glue and secure with screws. Repeat for the second disk. The gap between my two round disks is about two inches at the most narrow point.
Now that you have messed up your fabulous paint with all the screws, you’ll need to fix it. Apply wood filler over each screw hole. Allow the filler to dry, sand gently and then touch up with a little white paint. Allow the paint to dry.

Dip a paintbrush in medium blue paint and remove most of the paint, by brushing along a paper towel. You want your brush to be almost dry of paint. Paint along the three front boards keeping most of your paint along the outer edges of the boards, but adding a little all over the boards. Keep your brush almost dry when painting this or it will be too dark.
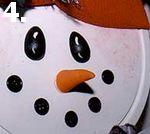
Referring to photo Step 2, at right, use a pencil to write the words across the two bottom boards. Once you have the letters lined up and sized to your liking, paint the letters using your blue paint and add a little watered down red paint for face cheeks (see photos 3 and 4).
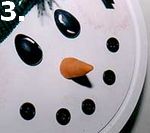
Once all your paint is dry, apply a final coat of polyurethane to all the wood pieces, including the wood eyes and then, you can assemble the faces. In photos 3 and 4, you’ll see close ups of both snowman faces. Using E6000 or Crafters Goop glue, attach the eyes, your carrot nose and buttons, as shown. Add a little white paint detail to the eyes and allow it all to dry. Please don’t use hot glue or craft glue for this. Once your project sits outside, the eyes, nose and mouth may just pop off.
Now you need your staple gun. Staple the hats and mittens to the wood pieces. I added a little fibre fill to the mittens and hats before attaching them, to give them a more puffy appearance.
Attach two jingle bells to a piece of yarn or shoe lace and tie a knot to secure the bells. Tie the other end of the shoe lace around the hat pom pom, or, if your hat has no pom pom, sew the shoe lace to the top of the hat. Repeat for the other hat.
Tie a scrap piece of fabric around each neck and tie in a bow. I didn’t attach the scarves with staples, but you can if you like.
Staple a Christmas pick or mini floral bunch to each hat front and one just below the bottom board.
Though I haven’t done this yet, I plan on adding a painted rule measure up the stake, in order to measure the snowfall. You c
an do this by allowing about 12 inches at the bottom of the stake for insertion into the ground, and then use a ruler to mark inches up the stake and paint with the same blue paint you used previously. This should be done before you apply a final finish of polyurethane.
Copyright © 1999-2023 Susan Spatone All rights reserved.


Leave a Reply