Last updated on December 9th, 2024 at 12:55 am
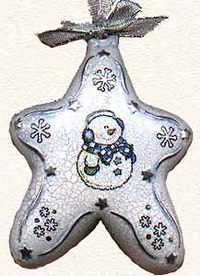
How to use a few simple crafting techniques to make a one-of-a-kind bisque snowman ornament.
Craft Supplies:
AllFreeCrafts is reader supported! Many supplies are found at thrift stores so try that first! However, if you buy from an affiliate link on this site, I earn a commission at no extra cost to you. As an Amazon associate, I earn from qualifying purchases. This has kept AllFreeCrafts.com online since 2002. Thank you!
Bisque Ornament [I used a Provo Craft Ornament, purchased at Michaels]
Blue Acrylic Paint
Metallic Silver Paint Pen
Snowman rub-on transfer
Delta Ceramcoat Fine Crackle [Step 1 and 2]
Gloss Varnish
Small Paint Brush
Liner Paint Brush
Project Instructions:
Apply rub-on transfers to a clean bisque ornament. Refer to the photo for placement ideas. I used a Provo Craft First Impressions rub-on transfer. Be sure your transfers are secure to the ornament.
Following the manufacturer instructions, apply crackle medium to the entire ornament. I used a fine crackle medium, but you can use any crackle medium of choice. Once your crackle is completely set, apply blue paint to all areas of the ornament. With a slightly damp cloth, wipe away excess paint, so that the cracks are filled with paint and very small amounts of blue paint is visible in the cracks. Allow to dry and apply a gloss varnish to entire ornament.
You may need to apply more than one coat of varnish for a nice gloss finish. Be sure to wait for each coat to dry between applications. I like using Delta Ceramcoat CERAMCOAT Gloss Varnish for these kinds of projects. It dries in minutes and has a wonderful gloss finish.
Once all your varnish is dry, using a silver metallic paint pen, add details around the ornament. I painted all of the raised areas of this ornament. You’ll need a steady hand for this, so if you’re new at this, you may want
to practice on something else first.
Unfortunately, the photo is not as clear as I’d like, but these ornaments have that wonderful aged appearance and make wonderful gifts for friends and family.
Copyright © 1999-2023 Susan Spatone All rights reserved.

Leave a Reply