Last updated on February 25th, 2018 at 10:28 pm
How to make a Doily Potpourri Ball Christmas Ornament
by Twila Lenoir
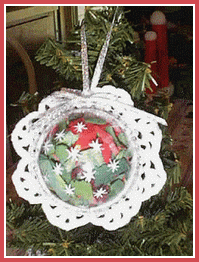
Here’s a budget stretcher ornament to make for the tree – use one potpourri ball to make two potpourri ball decorations!
Supplies:
- half of a potpourri ball (clear plastic balls with ventilation holes, available at craft stores)
- small doily
- white model car paint or craft paint
- thin ribbon
- string of pearls or similar
- potpourri
- craft glue or hot glue
.
What is great about this project is that you can make two potpourri balls out of one – so you’ll have one to hang from your tree and one to give as a gift.
1. Take half of a potpourri ball and clean it thoroughly by wiping with rubbing alcohol. Let dry.
2. Paint simple snowflakes on the front. This is so easy! Just paint an X shape, then paint a line down through the X and another line across…voila, instant snowflake design!
3. Once the paint is dry, turn the ball over and fill with potpourri. Put a thin line of glue all around the rim of the ball and place the doily on top. Turn the ball over and gently pull at all sides of the doily to make sure that it is taut and the ball is evenly placed in the center. Let the glue dry.
4. Take a piece of thin ribbon and insert it into the top of the hanger part of the ball, where there is a small hole, to make a hanger. Tie off.
5. Glue the strand of pearls or beads around the ball and the doily, as shown in the photo.
6. Finally, take another piece of thin ribbon, make a bow, and glue it on the top of the ball covering the hanger hole.
Tip:
To refresh the potpourri fragrance when hanging your ornament next year, just let a few drops of potpourri oil or essential oil fall through the holes of the doily and onto the potpourri.



Leave a Reply