Last updated on December 8th, 2024 at 12:03 am
How to Make a Christmas Shadow Box
by Jane Lake
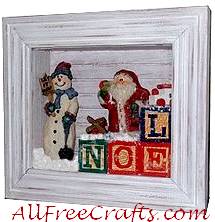
Use small ornaments and Christmas figures to make a Christmas scene, with shifting snow, in a shadow box. This would be a nice activity to do with your children – let them play with the figures until they create a pleasing arrangement, then help them to glue everything in place.
You Will Need
- shadow box – at least 1-1/2 inches deep (available at craft stores or bargain stores)
- assorted Christmas figures and small decorations
- optional: alphabet blocks
- strong craft glue or glue gun and glue sticks
- crystal snow or fine artificial snow
Project Instructions:
Remove the back of the shadow box and set aside.
Collect an assortment of Christmas figures and decorations and, working from the back, start to play with different arrangements until you create a Christmas scene that you like when seen from the front.
Begin gluing in the various pieces. If you’re using alpabet blocks, as we did, make sure they either sit firmly against the glass, or have enough clearance to prevent fake snow from getting trapped in front of them. Some possible short letter combinations for the alphabet blocks include NOEL, XMAS, SNOW, ANGEL or JOY.
Make sure all the pieces are glued in firmly; you don’t want them coming adrift after the shadow box is filled with snow and assembled. Let the glue dry.
Add spoonfuls of fake snow to the bottom area.
Run a line of glue around the edge of the back and set firmly into place.
Once the glue is dry, you can tilt the shadow box creating movable drifts of snow around the feet of the Christmas figures.


Leave a Reply