Last updated on December 7th, 2024 at 11:45 pm

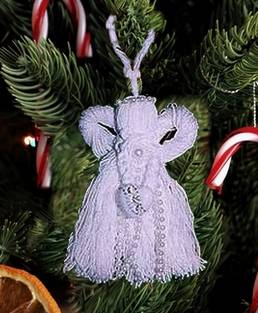
White crochet cotton is commonly used for doilies, lace, embroidery and even crocheted jewelry. But, in this easy Christmas project, you’ll use white crochet cotton to make a sweet little winter white tassel angel. Hang her on the Christmas tree, use her as a gift tag, or even add a pin back and wear her on your lapel.
You Will Need:
- White crochet cotton (Amazon)
- Heart shaped bead or small charm
- Hot glue gun and sticks (Amazon)
- 2 pieces of cardboard – one 4″ square and one 3″ square
- Scissors
- strand of small white pearls (Amazon)
AllFreeCrafts is reader supported! Many supplies are found at thrift stores so try that first! However, if you buy from an affiliate link on this site, I earn a commission at no extra cost to you. As an Amazon associate, I earn from qualifying purchases. This has kept AllFreeCrafts.com online since 2002. Thank you!
How to Make a Crochet Cotton Angel
Please refer to the Crochet Cotton Angel Assembly Diagrams, shown below, as you first proceed through the steps to make this angel. The diagrams illustrate how to complete each step.
Once you have learned the basics, you’ll know how make your own pretty, winter white angels without further instruction. Or you can take a shortcut and use premade silky tassels to make these lovely angels or even Ribbon and Tassel Angels. All a variation on a sweet, angelic theme. Totally your call!
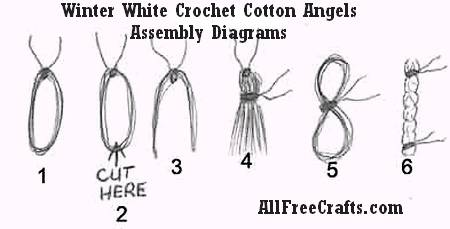
Diagram 1: Wrap white crochet cotton around a four inch cardboard square about 150 times. Cut a small piece of cotton string, feed one end under your layer of cotton threads and tie a secure knot to hold your cotton strands together. Gently pull the strands off of the cardboard square.
Diagram 2: Place scissors inside the loop and cut through all the cotton strands. Your work should now look something like the hand-drawn illustration for Diagram 3.
Diagram 4: Shake out all the strands, so they are all straight and wrap a piece of cotton around the top section and tie a secure knot. This will create the tassel shape. Trim away any uneven strands at the bottom of your tassel.
Diagram 5: Wrap cotton around the three inch piece of cardboard, as before, about 75 times. This will create the wings. Carefully pull the strands off the cardboard, keeping one finger at each end of the loop. You do not want all the strands to come together. Once you have the strands off the cardboard, twist the loop into a figure 8 shape and tie a piece of cotton around the centre, keeping the figure 8 shape.
Diagram 6: For the arms, I braided the cotton to create a length that measures about 4 inches when completely braided. This is a little more difficult to do, but with some little hands holding one end, while you braid, you will have it done in no time at all. You only need about 12 strands of cotton for this braid, dividing your strands into 3 sections of 4 strands to create your braid. Tie each end of your braid with a small piece of crochet cotton to secure it.
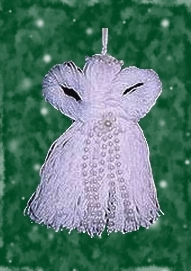
Final Assembly: Now you must glue all the pieces together.
This is a back view of the angel. It shows how I glued the arm centre to the back centre neck area. Do the same for your angel.
Next,glue the wings on top of the arms at the back and add a couple of dots of glue to the wings in order to help them retain the sideways 8 shape.
Pull the arms to the front and glue a decorative heart-shaped bead, or your choice of a charm, to the hands. Be sure that glue touches both of the hands and the button.

To finish, glue a small circle of pearl strand to the head for a halo and a few strands to the button back and at the centre of the wings on the back of the angel.
Your angel is now ready for her place on the Christmas tree.
Happy Christmas!
Copyright © 1999-2024 Susan Spatone All rights reserved.




Leave a Reply