Patchwork Afghan By EverythingStudio!
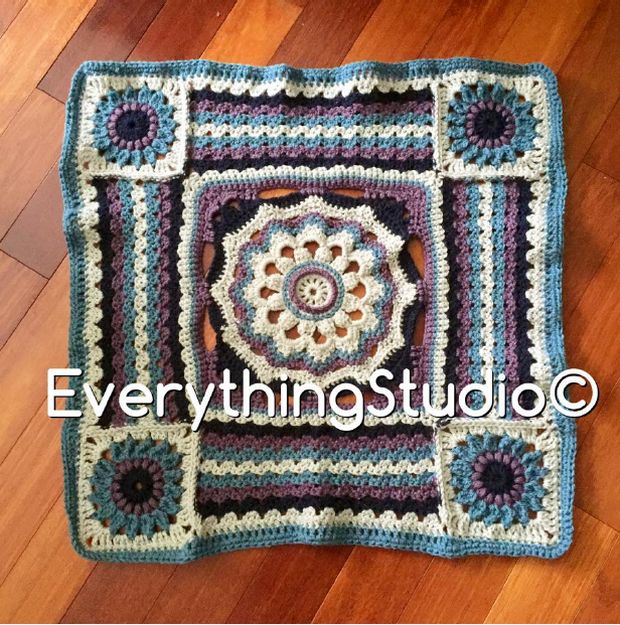
Free Patchwork Afghan pattern uses four yarn colors and a unique combination of a medallion (or mandala) center, coordinating rows and granny square corners.
Designer: Megan Cyhanick
Materials:
Your choice of 4 different colored yarns
I used Vanna’s Choice Lion Brand, medium 4,
with a size 6mm crochet hook
Colors
I used:
A = Linen (creamy white color)
B = Dusty Blue (pastel/earth tone)
C = Dusty Purple (pastel/earth tone)
D = Navy Blue
Symbols and meanings for this pattern:
sc single crochet
hdc half double crochet
dc double crochet
tc treble crochet
// signifies each stitch in your work
/,/ more than one crochet worked into the same stitch
** side notes
Patchwork Afghan By EverythingStudio!
LETS BEGIN
Start with a slipknot and then chain one. Slipstitch into the first chain.
ROW 1
Using color A:
Chain 2 (this counts as your first double crochet) then double crochet into the same stitch 11 times. Connect by using a slipstitch into the top chain of the first double chain in this round.
** so if you look at it you should see 12 “spokes in your wheel” so to speak**
ROW 2
Chain 1, half double crochet in the same first space. Continue with 2 half double crochets in each space between the 12 double crochets of the previous round. Slipstitch into the first chain to complete the round.
ROW 3
Chain 1, half double crochet into the same space. Continue with hdc/hdc,hdc/hdc/hdc,hdc,/hdc and so on. Slipstitch into the first stitch to complete the row.
ROW 4
Chain 3, treble cluster by tc/tc,tc/tc (chain 3) tc/tc,tc/tc (chain 3) and so on.
**Remember the first chains count as the first treble crochet in the first section.
Here’s a video in case you’ve never done this before. (But unlike the video make sure you crochet into three stitches instead of just the one because we are working a circle and not a straight line. The video simply tells you how to complete the stitch).
Continue this until the row is complete and then slipstitch into first stitch to complete the row.
ROW 5
Chain 1, in each section between clusters put sc/sc/hdc/dc/tc/tc/dc/hdc/sc/sc
**Remember the first chain counts as the first single crochet in the first section.
**the sections will bend in an outward arch, don’t worry that’s perfectly normal!
Slipstitch into the first stitch to complete the row.
TWO COLORED INNER CIRCLES:
Since we are switching colors now is a good time to do the top stitch for the two colored inner circles.
When looking at the side you want showing (back or front depending on your preference, I have the back showing, it looks more wintery to me. Depends on what look you prefer). Anywho, using color C you start on the 2nd row and complete a full single stitch all the way around to form a circle, slipknot through the beginning and yarn needle it through the back to tie it off.
For the row using color B you do a slipstitch instead of the full single stitch to give it a slightly lower texture. Same with the previous, you slipstitch it off and yarn needle it through to the back to tie it off how you see fit.
ROW 6
Using color B
Chain 1, centered on each petal: /sc/sc,sc/dc,dc/sc,sc/sc/ (chain 1 and skip over 5 stitches to continue)
**the chained section should leave a small section blank to give it a more organic feel**
**if your work isn’t flat don’t worry mine wasn’t either, it flattens out after the next few rows**
ROW 7
Using color C
Chain 1, centered on each petal: /sc/sc/sc,sc/sc,sc/sc/sc/ (chain 1 and skip over 3 stitches to continue)
ROW 8
Using color A
Chain 1, centered on each petal: /sc/sc/sc,sc/sc/sc/ (chain 3 and skip over 5 stitches to continue)
ROW 9
Each tip of the petal will have the tc’s
Starting at the first non-chained stitch of the previous row your pattern looks like this: /dc/dc/dc,tc/tc,dc/dc/dc/ double
crochet the chains and continue with
/dc/dc/dc,tc/tc,dc/dc/dc/
**the tips of the petals should look pointy**
ROW 10
Using color D
**transitioning to a more hexagonal look so this row evens out the depth of the petals**
Starting at the tip of a petal: /slipstitch/sc/hdc/dc/dc/dc/dc/dc/hdc/sc/slipstitch/
and so on…
ROW 11
This row is to establish the four corners. So you will do a sc for two sections and then a corner as explained below and then sc for two sections and then corner until you have all four corners and the row completed.
Corner sections: /hdc/dc/tc/chain 5/ (tc cluster)tc/tc,tc/tc/ chain 5/tc/dc/hdc
ROW 12
Using color C
For the non corner sides: /chain 8 and skip 10/sc/sc/sc/sc/chain 8 and skip 10/
For the corner sections: /dc/dc/hdc/sc,sc,sc,sc,sc/sc,sc,sc,sc,sc/hdc/dc/dc/
ROW 13
Using color B
Sc all around but for the corners do this …/sc/sc,sc/sc/sc,sc/sc/….
ROW 14
Using color A
Sc all around but for the corner stitches do: …/sc/sc/dc/sc/sc/…
ROW 15
Sc all around but for the corners stitches do: … /sc/sc,sc/sc,sc/sc/ …
FOUR SMALLER GRANNY SQUARES
Follow the typical sunburst granny square to complete four of these using (from the middle outwards) D, C, B, A
Here is a great video for those of you who don’t know how to do them:
THE SIDES OF THE BIGGER SQUARE
All four sides will be completed in the same way using the double crochet.
ROW 1
Using color D
Start at the exact corner stitch and chain 3 skip over 1 stitch and start your double crochets there. Your row should look like this: /chain 3/ /dc,dc,dc/ / /dc,dc,dc/ / /dc,dc,dc/ / /dc,dc,dc/ … … /dc,dc,dc/ / /chain 3 and slipstitch into exact corner stitch of previous row.
ROW 2
Using color C
Start in the third chain of the previous row, chain 3 in the new color and then insert your 3 dc’s in the middle stitch of each “cluster” of the previous row. Every row should have the same amount of clusters as the one above or below it.
ROW 3 -‐ 8
Repeat the directions above changing colors with each row.
Row 3 = B
Row 4 = A
Row 5 = B
Row 6 = C
Row 7 = D
Row 8 = A
**continue for all four sides making sure to leave open the space for the granny squares to fit in the corner spaces.
ATTACH THE SQUARES
Attach the squares with a slipstitch along the chain sections of each row. If you’re not sure how to join granny squares here is a video that helped me in the past:
BORDER ROW 1
Using color A
Sc around the granny squares and dc around the sides. Make sure to add a few stitches around the corners to keep everything flat. I added 3 on every corner.
BORDER ROW 2
Using color B
Sc around the granny squares and dc around the sides. Make sure to add a few stitches around the corners to keep everything flat. I added 4 on every corner.
BORDER ROW 3
Sc around the granny squares again but use a hdc for the sides. Don’t forget to add your extra stitches in the corners!
FINISHING THE BLANKET
Now that you have one square completed its time to do as many more as you wish, I am using four to join together to make a medium size afghan for our chair.
**I recommend doing a border around the entire blanket in the same color you use to join the squares. I used the cable stitch for the 4 of mine. And then a shell border in the navy blue! Here is a video to show you the process.
CABLE CROCHET STITCH:
SHELL BORDER STITCH:

Leave a Reply