Last updated on October 31st, 2024 at 09:27 pm
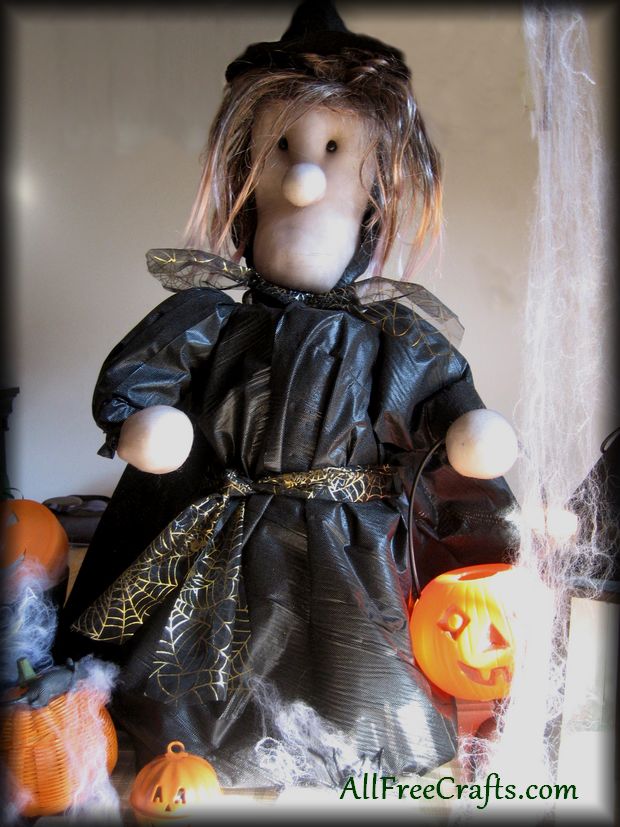
Where did she come from, this soft sculpture witch? Stir together nylon stocking scraps, stuffing, plastic pots, landscape fabric and ribbon. Like magic, Winnie, the soft sculpture witch, appears.
And the actual project is almost as easy as that. After seeing the outrageous prices for store-bought Halloween decor, I was determined to make this year’s Halloween mood setters for next to no cost. Enter Winnie, ghostly gourds and the famous one-sock bat. Definitely Halloween on a budget – but with dangerous and delightful flair!
YOU WILL NEED:
- flesh tone nylon pantyhose or a knee-high stocking
- 4 chenille stems
- 2 wire floral stems
- 2 black beads or buttons (eyes)
- rubber bands
- fake hair extension from the dollar store
- 3 inch wide ribbon
- black narrow ribbon or string to tie arms
- black felt
- two 6″ diameter plastic pots each about 7″ high
- pebbles for weight
- landscape fabric
- 1/2″ dowel or stick
- polyester batting (stuffing material)
- needle and thread
- adhesive tape
- tacky glue
- measuring tape and scissors
DIY Instructions:
MAKE THE WITCH’S SOFT SCULPTURE HEAD
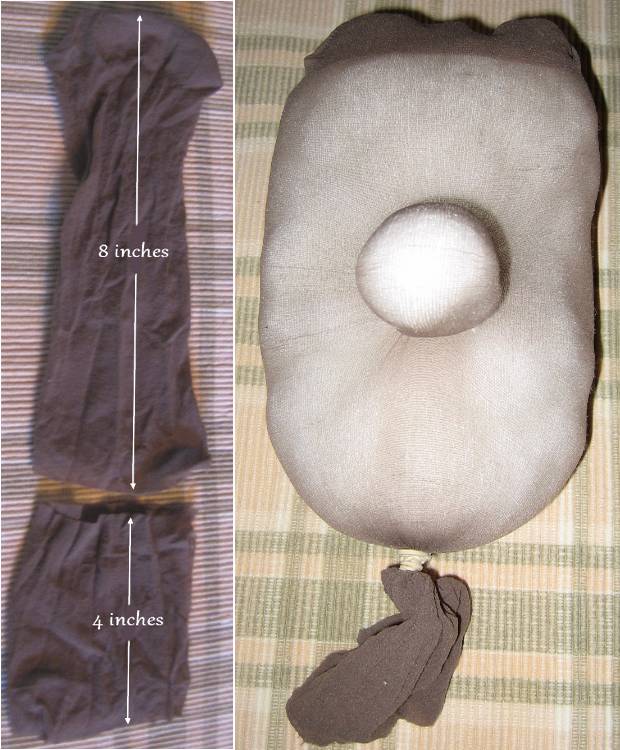
- Cut one length of nylon hose, about 8 inches long, including the toe area. Cut two more pieces, each 4 inches long and set these aside.
- Stuff the longer piece of hose with batting. Gather a section in the middle and use the stuffing to form a nose. Cinch the nose together at the base with a rubber band. Decide on the length of the face; secure with another rubber band at this point.
- Thread a long sewing needle with black thread. Bring the ends of the thread together but do not knot them. Press the needle through the back of the sculpture at the point where you wish to place the first eye. Take a small stitch, then another to secure it, thread the needle through the button and then through stuffing and out the back. Take a small stitch, then a long stitch to the position of the next eye and repeat the procedure, ending with two small stitches on the back to secure. Cut the thread and tie down the ends with a double or triple knot. Cut off the remaining thread tail.
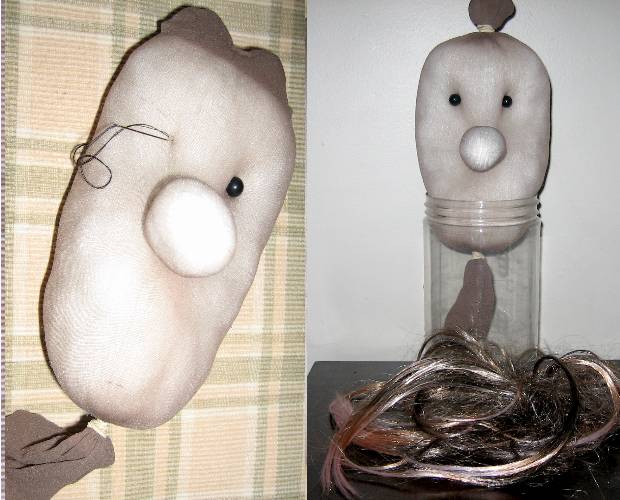
- Gather up the toe area of the hose and cinch it in the same way that you did the bottom. You should now be able to sculpt the witch’s face with your fingers. Pinch the area above the nose to give it depth, and experiment to see if you want the face shorter and fatter or narrow and long. It’s a witch – warty bumps are ok!
- Attach the hair extension to the top of the witch’s head with a rubber band.
DIY WITCH’S HAT
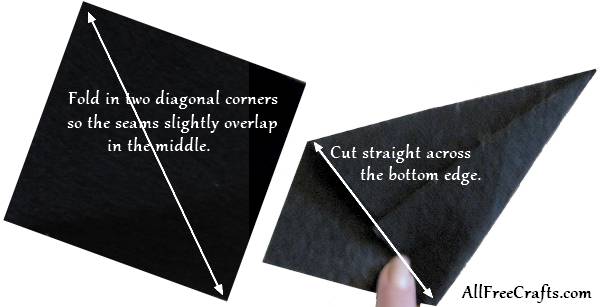
- Cut a 6 inch circle of black felt for the hat brim. Also cut a 6 inch square from felt, then fold opposite diagonal corners in toward the middle, overlapping seam slightly. Cut straight across the bottom, forming a triangle, as shown in the closeup photo above.
- Next, refering to photo below, cut a slight curve along the bottom of the triangle. Use tacky glue to hold the center seam together. Hold the seam securely with clothespins until the glue dries. Open the triangle into a cone and apply tacky glue along the bottom edge. Center this upon the felt circle and press down. Allow the glue to dry to form the witch’s hat. Position the hat on the witch’s head. Tack in place with a few small sewn stitches or use a couple of hidden safety pins to secure it.
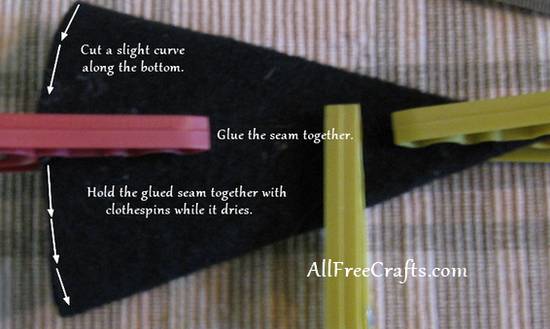
Notes: If I made this witch again, I might make the hat a bit larger, starting with a 7 or 8 inch circle for the brim, and a 7 or 8 inch square for the peak.
MAKE THE WITCH’S BODY FROM PLANT POTS

- You will need two identical plastic plant pots, each about 7 or 8 inches high, to make the witch’s body. Turning a pot upside down and placing it on top of the other one forms the basic body shape. The uppermost pot, like most plant pots, must have a center hole and equally spaced holes around the bottom (which becomes the top when you turn it upside down).
- Measure the height of your two pots and add 3 inches. Cut a stick or dowel to this length and insert it through the center hole of the top pot. Add pebbles and stones around the bottom of the lower pot to provide weight and stability, and to hold the center supporting stick in place. You will probably need two or three layers of stones.
- At this point, attach the pots together temporarily with three or four small pieces of tape.
- Undo the rubber band at the bottom of the witch head. Poke your finger about three inches into the middle of the stuffing. Place the witch’s head over the stick that is standing up through the center of the top pot. Cut the rubber band with scissors and wrap it back around the bottom of the witch’s head to make the neck. Tie the cut ends of the rubber band together, securing the head in place. You could also use ribbon, elastic, twist ties or chenille stem to complete this step; just make sure the head is securely in place and will not move.
DIY POSEABLE WITCH’S ARMS
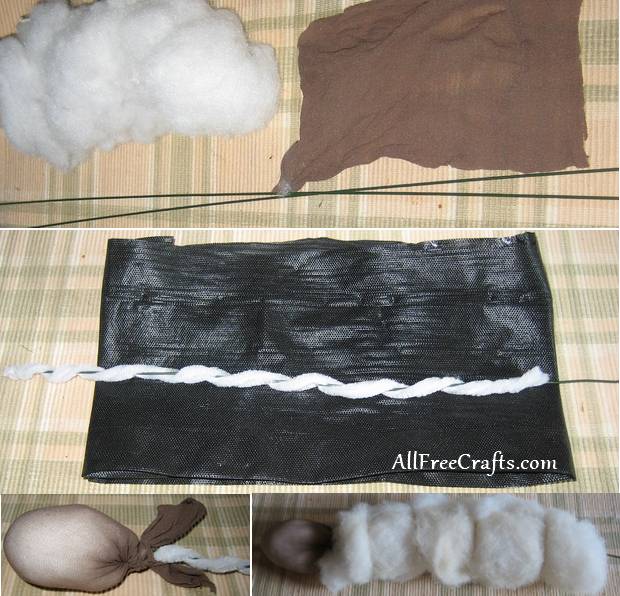
Twist two 12″ chenille stems together then wind them around an 18″ wired floral stem. Leave about 6″ inches of the wired stem extending beyond the chenille. Curl over the top half inch so it won’t poke through batting in the next step.
Cut open both pieces of 4″ nylon stocking. Form a piece of polyester batting into a ball to make the hand. Wrap this around the top few inches of the twisted together stems. Cover with one of the nylon pieces, tying the nylon together at the base of the hand to secure. Wrap the remaining arm, to the bottom of the chenille stems only, with polyester batting as shown above.
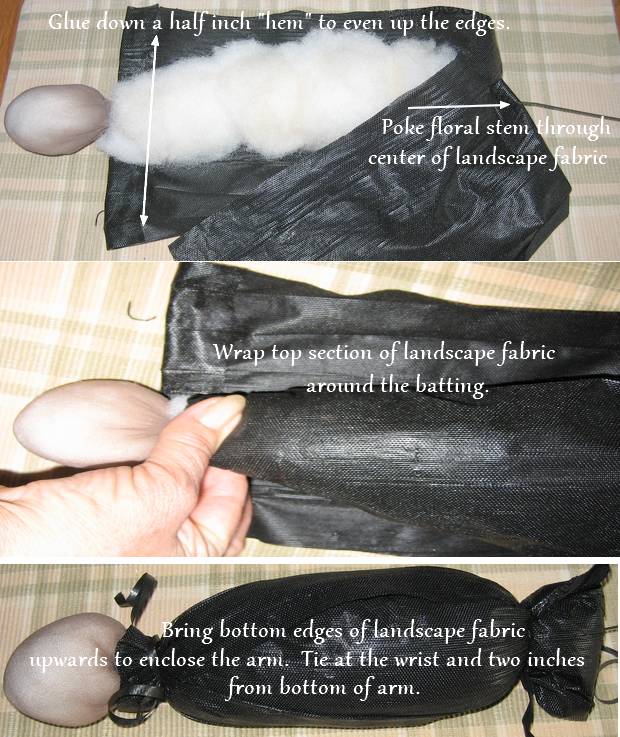
Cut a piece of landscape fabric to twice the length of the arm, plus a half inch. It should also be wide enough to wrap comfortably around the batting. Fold over a half inch on the wrist end of the landscape fabric and glue it down to even up the edge. Fold the landscape fabric in half and poke the floral stem through the center of the half way mark.
Fold and wrap the top half of the landscape fabric around the batting. Bring up the bottom edges and smooth the fabric down all around. Tie at the wrist and about two inches from the bottom with black ribbon. Knot ribbon securely and cut off the ends.
Now it’s time to attach the arms to the body. Undo the temporary tape holding the pots together and thread the wire stem of the arm through one of the holes on the top side of the upper pot. Stuff the bottom edges through the hole as well. It will probably be a tight fit, but gradually push it in from the top and use your other hand to pull it through from the inside. When it is all through to cinched and tied area, bend the wire stem and poke it through a hole at the back.
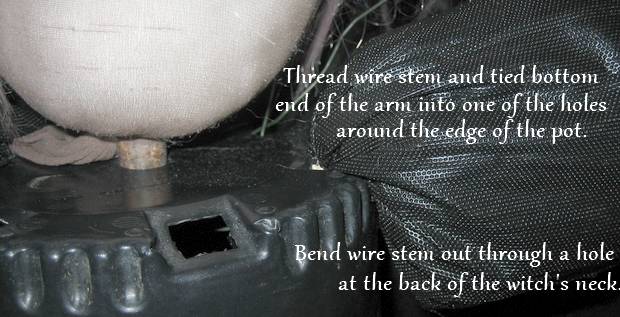
Make the other arm in the same way. Poke the wire stem through the same hole as the first stem. Twist both wire stems tightly together to secure the arms in place.
Weigh the witch down – you don’t want her moving around on her own! Move the pebbles inside the lower pot, set the stick in the middle, rearrange the pebbles to distribute the weight evenly and run adhesive tape around the join of the pots to secure them more permanently.
DRESS YOUR WITCH IN A LANDSCAPE FABRIC CAPE AND DRESS
Not gonna lie – this is the fun part of your DIY witch assembly so just get creative! Follow the directions to form the main part of the landscape fabric dress/cape combination, but add your own details and embellishments. You’ve stuck with me so far and…I’d just love to see photos of your witch!
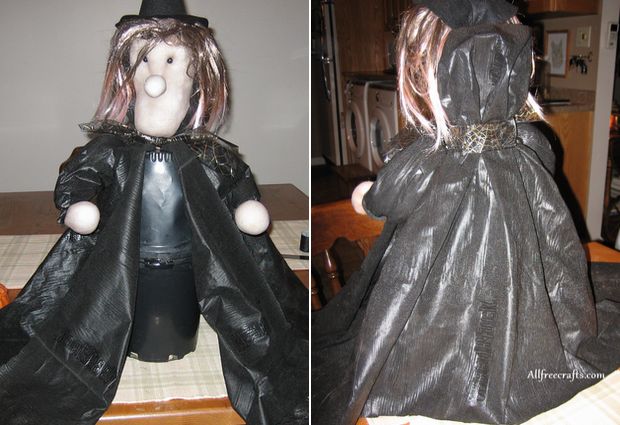
- Cut a piece of landscape fabric long enough to cover the combined height of the pots plus 6 inches (about 20 inches high in my case). The fabric also has to go around the witch’s body with lots to spare. Position the fabric around the neck of the witch and bring it around to the front. Pull up a length at the back of the neck, as shown, to form the cowl of a cape. Cinch the fabric around the neck with wide Halloween ribbon. My ribbon was adorned with golden spider webs.
- Allowing lots of fabric to remain behind as a cape, cut a slit on either side at the right height for sleeve holes. Fit the arms through the slits.
- Drape the dress fabric around the witch, overlapping it at the front. Cut two more slits on either side, below the arm holes, at waist height (where the pots join). Slide a length of ribbon behind the pots at waist height and thread the ends through the slits just made. Drape and reposition the landscape fabric until it looks good then tie the ribbon together at the front as a belt. This creates the effect of a separate dress and cape.
- Trim the bottom of the landscape fabric all around so it falls just above the surface of the table.
FINISHING TOUCHES
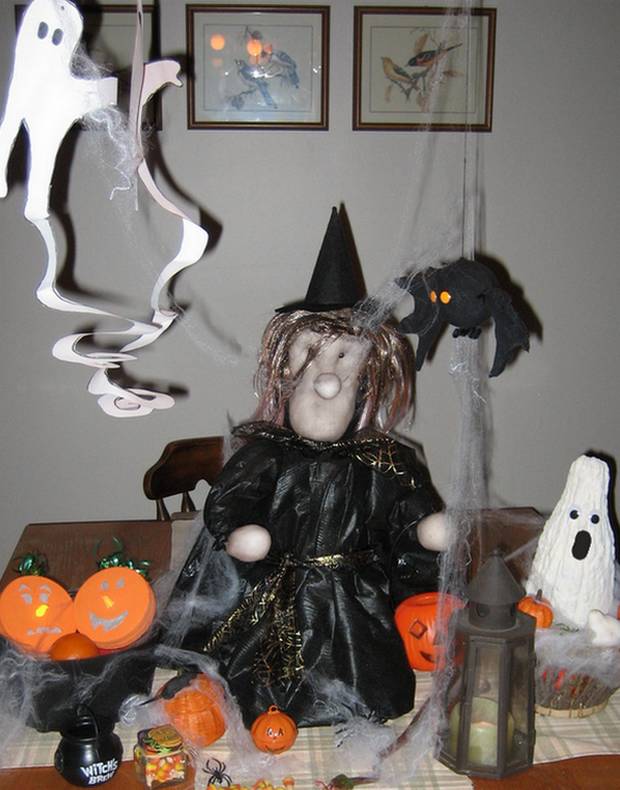
To finish your witch, bend the arms as desired. They will hold a small amount of candy on a paper plate or a small plastic pumpkin (as shown). The finished witch is ideal as the star of a tabletop Halloween centerpiece. She also looks great on a hall table, or in a strategically lit tableau on the front porch, to help you greet Halloween trick-or-treat visitors.



Leave a Reply