Last updated on September 7th, 2015 at 09:49 pm
Recycled Juice Carton
Halloween Doorstops
by Jane Lake
The original idea for this easy recycling craft project was submitted by Franceska, a fellow member of the wonderful WasteNothing Recycling Yahoo Group. The orange cap on an empty Orange Maid juice carton caught her eye … and a little while later, a black cat doorstop was born.
Here we’ve provided three ideas for recycling a cardboard juice or milk container into one of three Halloween creatures – a black cat, ghost or witch. But we’re sure, with a bit of imagination, you could create all kinds of Halloween figures. How about a Frankenstein head? Or maybe even a miniature version of our Cardboard Box Halloween Costumes?
Basic Supplies:
- cardboard juice or milk container
- scrap fabric to cover container

- sand as weight
.
Directions:
For any of the Halloween doorstops, first rinse, clean and empty the juice or milk carton and fill partially with sand for weight. Cover with fabric and add embellishments as directed below. If the carton cap is the wrong color, paint it with craft paint in the right color before proceeding.
To Make the Cat:
» black fabric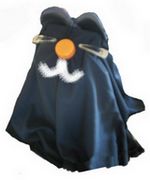
» black meat tray (ears)
» one white chenille stem (whiskers)
» hair barettes (in place of eyes) or cat glasses
Remove the orange cap, fill carton part way with sand, cover with black cloth and screw the cap back on to form the cat’s nose.
Cut two triangular corners from a black meat tray to make the ears; you can attach them to the carton, through the fabric, with black paperclips, or glue them in place.
Slip clip-style barettes into place, as shown on the photo. Alternatively, fit on a pair of cat-shaped eye glasses, or fashion some almond-shaped cat eyes from paper or felt.
Bend a chenille stem into a “W” shape to make the whiskers. Glue in place beneath the nose, or loosen the orange cap a little bit, insert the middle of the stem underneath it, then retighten.
 To Make the Witch
» black or dark purple fabric
» witches hat (purchased, or make your own from felt, foam, or construction paper)
» two green chenille stems (arms)
» craft glue
» green fabric paint
» plastic goggle eyes, or make your own from a circle of white paper and black marker
» two small triangles of black felt or paper (shoes)
» miniature straw broom
Remove the carton lid and, if desired, paint it green. Drape the carton with purple fabric and screw on the carton lid to make the witch’s nose.
Place the witch’s hat on top of the carton. Beneath this, glue on homemade or purchased eyes.
Paint on a witchy mouth, as shown in the photo, including a couple of ugly snaggle teeth for effect.
Form two arms for the witch from green chenille stems, bending back the last half inch of each stem to make a hand shape. Cut a small slit on either side of the carton, where you want the arms to begin; also poke a small hole in the carton at this point. Dip the shoulder end of each arm into a little glue, then insert through the slit in the fabric and into the hole in the carton. Allow glue to dry before positioning the arms where you want them.
 Glue the straw broom to the end of an arm, as if the witch is holding it. To finish, g6lue two triangles of black felt or paper to the bottom of the carton, so they are visible beneath the fabric as the witch’s feet.
To Make the Ghost:
» white fabric
» black marker or paint
This ghostly doorstop is easy! Simply remove the cap, as it is not needed on this version. Cover the carton with white fabric. If desired, secure the fabric in place with pins or glue. Paint on a ghostly face. Done!


Leave a Reply