Last updated on March 1st, 2016 at 11:53 pm
 Tweedy Double Moss Stitch Sweater – Free Knitting Pattern
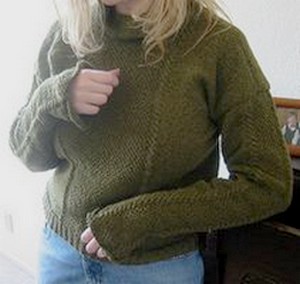
This sweater is worked in the round for the body and then steeked – the armholes are slashed open and the knitted sleeves are sewn to the body. This makes it a lot more efficient and easier to work the body since you don’t have to worry about right side vs. wrong side. The sweater has a central panel done in a cable and double moss stitch pattern on the front and the back, and each sleeve is narrow at the wrist with a flare that reaches the knuckles, and they have the same cable and double moss stitch motif down the top.
Silk City Softball Tweed yarn was used to make the sweater. The yarn lies somewhere between fingering weight and sport weight, and it’s a cotton core bound with a nylon web, which gives it both its tweedy look and a soft stretch. Buy some at major discount at Elann.com before it disappears if you want to use this yarn!
The sweater is sized for a woman’s XL (unfortunately I don’t know how to size down a pattern yet for other sizes – if you know how and want to help, let me know!). I also went against convention and worked the neck shaping in quarters (left front, right front, left back, right back) because I hate hate HATE working two sides of a sweater simultaneously with separate balls of yarn.
I designed this sweater specifically to be almost patternless – very easy to knit, something I could do while chatting, and something I could easily adjust as I knit. If you know how to read the stitches on your needle, you won’t really need a pattern at all except to guide you on finishing. Because it’s done in the round, you can try it on as you go, so feel free to use this pattern merely as a rough approximation and adjust all measurements and lengths here to your liking. Enjoy!
.
Gauge
13 St st = 2″
10 rows = 1″
Materials
About 1200-1400 yds Silk City Softball 2.2N Tweed (bought at elann.com — you will use about half of a cone)
1 size 4 circular needle and 1 size 5 circular needle (about 24″ or larger)
1 size 5 circular needle, 16″
Scrap yarn or stitch holders
Stitch markers
A sewing machine
Stitch Patterns
Double Moss Stitch
Rows 1 & 2: *k1, p1*, repeat between *
Rows 3 & 4: *p1, k1*, repeat between *
3×3 Twist Cable
Rows 1-4: k6
Row 5: place 3 stitches on cable needle and hold behind work; k3; k3 from cable needle.
Instructions
Body
Using a size 4 needle, cast on 270 stitches, placing markers at both the beginning (first stitch) and the middle (135 stitches). These markers mark the sides of your sweater body.
Work in 2×2 rib (k2, p2) for 1.5 inches. Switch to size 5 needle.
Knit 42 stitches in stockinette, place marker. Knit 1 twist cable, then knit the next 31 stitches in double moss stitch, and then knit one more twist cable. Place marker. Knit the last 42 stitches (to sweater side marker) in stockinette. Repeat around back of sweater.
If you’re resizing this pattern, just divide both the front and back into thirds, then use the middle third for your cable-double moss stitch-cable pattern.
Continue working body in pattern, using the cable-dbl moss st-cable pattern between markers, for 19″ (until neck shaping).
If you want to add a little shaping to the garment like I did at the waist, decrease 2 st each side of side markers every 1 inch 5 times, then increase the same way.
Neck Shaping: Front
Mark off the center 20 stitches for the neck on front of sweater. Using scrap yarn, thread all of the stitches on your circular needle onto the scrap yarn except for the stitches between the first side marker and the first neck marker (these stitches will be the sweater’s left front). You should now only have the first third of the front stitches on your circular needle. You’re going to work back and forth to knit this part of the front of the sweater.
Next row: Knit in pattern until neck edge; turn work.
Row 2: Bind off 2 st in pattern; knit in pattern to end of row.
Row 3: Knit in pattern until neck edge; turn work.
Row 4: Bind off 1 st in pattern; knit in pattern to end of row.
Row 5: Knit in pattern until neck edge; turn work.
Row 6: Bind off 1 st in pattern; knit in pattern to end of row.
Continue working this side in pattern, back and forth, until shoulder to hem measures approx. 22″. Place shoulder stitches on holder. Cut yarn, leaving fairly long tail (secure with a pin if you’re afraid it’ll come loose).
From the stitches on scrap yarn, place the right front stitches (from neck edge to other side marker) on circular needle, leaving the original 20 neck st on a holder or separate piece of yarn. Once you move your left front stitches, the only stitches remaining on the scrap yarn should be for the back of your sweater. Work this side as a mirror of the left front you just finished, binding off stitches at the neck edge in the same manner. When shoulder is 22″ in length to hem, place stitches on holder and cut yarn.
Neck Shaping: Back
Place all stitches on scrap yarn for the back onto your circular needle. Knit in pattern back and forth until back is 1″ shorter than front at shoulders. End with a wrong-side row.
Mark off center 24 st in back. Place these and the right back stitches on scrap yarn or holder, leaving the stitches between the left side and the left marker of the back neck stitches on the circular needle.
Next row: Knit in pattern until neck edge; turn work.
Row 2: Bind off 1 st in pattern; knit in pattern to end of row.
Repeat these two rows one more time. Continue knitting left back until same length as left front (22″ from shoulder to hem). End with a right-side row.
Binding off the shoulders:
Place stitches for left front on the left needle of your circular needle. Turn work inside out. Bind off shoulder seams together using size 4 needle; secure yarn end.
Leaving the center 24 neck st on yarn or holder, move the remaining back st to circular needle. Work as for left back, shaping at neck edge accordingly.
Turtleneck
With the smaller size 5 circular needle, pick up stitches evenly around neck, joining first and last stitches. Place marker at first stitch and work around in Stockinette stitch. Be sure to keep your tension loose.
At this point you have a couple of options for your neck:
If you prefer a tighter turtleneck:
Continue knitting around in St st until neck is desired height (try on for size). When it’s the desired height, knit to marker, then follow finishing directions for neck.
If you prefer a loose turtleneck/cowl look:This is the design shown in the picture. Knit the first couple of rows (St st). Begin adding invisible increases every 8 st. Knit another inch in length, then increase every 9 st. Knit another inch, increasing every 10 st. Continue in this manner for desired length, or stop adding increases when you feel the neck is wide enough. Knit to marker when desired height, then follow finishing directions for neck.
Finishing the neck:
If you prefer a rolled edge on your neck, bind off at this point (very loosely). If you prefer a non-rolled edge, work four rows of double moss stitch. At marker, begin binding off very loosely (for a loose bind-off, I use a suspended bind-off).
Sleeves
Cast on 82 stitches, placing markers after first and before last 25 stitches (leaving 32 stitches at center between markers). Work in pattern for 4 inches, decreasing to shape bell sleeve as follows:
Decrease 5 stitches on a single row every ?” until 52 stitches remain. Place these decreases evenly along the row by ssk halfway through first St st panel, ssk the last two stitches before first marker, k2tog or p2tog (depending on appropriate stitch) at halfway point in dbl moss stitch panel, k2tog after last marker, and k2tog halfway through last St st panel.
When 52 stitches remain, begin shaping increases for sleeve width as follows: increase one stitch each side every ?” increase after first and before last stitch. Continue until 90 st are on needle. Continue increasing every 1″ until 98 st are on needle.
Continue knitting in pattern until sleeve is 23.5″ in length. Beginning on next RS row, knit reverse St St for 1″. Bind off loosely.
Construction
This is the scary part: cutting your knitting! But don’t be frightened, you’ll feel okay about it once the sweater is finished.
Measure the width of a sleeve at the top. Divide in half, then place markers that many inches down on the body from the shoulder on both sides, marking the armpit of the sleeves.
Sew each sleeve seam. To add a bit of flair to the sleeve at the wrist, stop the seam about 2″ from the end, leaving a cuff similar to a dress shirt. This adds to the flare of the sleeve.
Using a contrasting yarn, on the body of the sweater mark the line of stitches from the marker up to the shoulder (the body splits slightly at this point) with a running stitch. Using your sewing machine and a thread that will blend with your yarn but not be too difficult to see, sew two lines of tight stitching close together on both sides of this basting, pivoting the sweater at the marker to make a rectangular bottom to your stitching.
With a small pair of scissors, snip the knitting between the stitches (where the basting yarn runs), removing your basting yarn as you go. Stop before you reach the bottom of the stitching.
Turn sweater body inside out. Place sleeve into armhole so that right sides are together for sleeve and body, matching the center point of the design motif to the shoulder seam on the body and the sleeve seam to the bottom of the armhole cut. Adjust so that the body fabric lines up with the bottom of the 1″ of reverse St st (this will act as a seam facing).
Sew sleeve to armhole. When finished, fold reverse St st allowance over and secure to shoulder seam and armpit, hiding the armhole seam.
Weave in all ends.

This work is licensed under a Creative Commons Attribution-ShareAlike 2.5 License.


Leave a Reply