Last updated on October 1st, 2015 at 02:56 pm
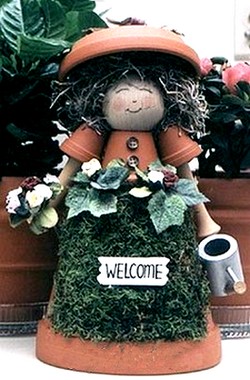
Mrs. Gardener is made from terra cotta pots and makes a lovely ornament for a gardener.
She can be displayed outside, but over time, the moss will dry and become a beige color. To keep her in pristine style, display her indoors and spray the fresh moss every now and then.
Materials:
- 4 Clay pots (1 large, 1 medium and 2 small)
- 1 Clay pot saucer
- Spanish Moss
- Sheet Moss
- Miscellaneous Floral Embellishments
- Small Wooden Welcome Sign
- Wood or metal watering can
- 2 Wood Pegs or similar pieces for arms
- 1 wood ball for face
- Household or Crafter’s Goop Glue (E6000 or other silicone based glue)
- Hot glue
- 2 buttons
- String, jute or other small rope
.
How to:
You will need to refer to the photos to complete this project. Look at the photos frequently as you proceed with assembly.
Begin by using a silicone-based glue (such as Household or Crafter’s Goop) to glue the centre of the medium size pot to the bottom of the large pot.
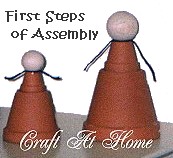
Place a strand of string across the bottom of the medium pot (centred, see First Steps of Assembly, at left), allowing enough excess string to fit through the small clay pots with a few inches more (this will help to support the arms). Glue on top of the string, the wood ball and allow the glue to dry completely before handling.
Feed the string on one side, through one small clay pot and hot glue the clay pot in place on the medium clay pot. Repeat this for the second arm. This will help secure the arms.
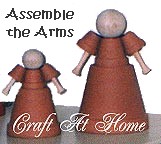
Now hot glue the wooden spindle (arm piece) to the inside of the small clay pot, making sure the string is glued to both the wood piece and the clay pot at the inside bottom of the small clay pot.
Referring to the photo, cut a piece of sheet moss to form her apron. This piece of moss will extend up and over the bottom of the large pot, but not touch the medium pot. Hot glue the sheet moss in place, making sure you apply plently of glue to the back area of the sheet moss.
Hot glue a little spanish moss the top of the wooden ball for hair. Also glue a little extra spanish moss to the inside of the clay saucer centre (this step will help the hat to sit a little higher instead of covering her face).
Hot glue a little sheet moss to the bottom centre of the clay pot saucer (top of hat) and glue a few little embellishments to the top of her h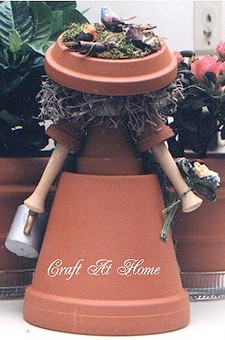 at. I used tiny birds and branches for this.
Hot glue a few florals to her waist area. Glue a watering can to the large clay pot and to the end of her arm. I used a wood watering can and simply painted it with a metallic silver and gold paint. If you use a wood watering can and plan on keeping her outside, it’s a good idea to drill a small hole in the bottom of the watering can to allow any water to escape (your can will eventually rot away, if water is left sitting inside for a long period of time).
Tie a small bouquet of flowers together and glue the bouquet to the large clay pot and wrap a tie around her hand to help keep the bouquet from falling. Glue two buttons to the front of her dress.
Hot glue the hat to her head, allowing the hat to fall backward slightly. Use lots of glue for this, you don’t want her hat to fall off. To paint her face, you can use markers, pencils, paint or any similar item. I used oil pencil crayons and simply drew lines to create her eyes and mouth. Her nose is a little U shape and little red dot is added for her cheeks. You don’t need a face painted, but she looks much prettier with a face.
The little Welcome sign is simply painted white, with a black painted welcome. For any painted parts, be sure to apply varnish or polyurethane to protect against moisture. Simply hot glue your welcome sign to the front centre of her apron, give the sheet moss a little spray of water and you are all done.
Copyright © 1999-2014 Susan Spatone All rights reserved.
Published with permission from CraftAtHome.com
Leave a Reply