Last updated on September 27th, 2015 at 02:34 am
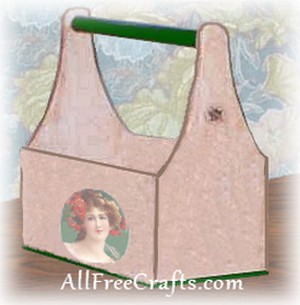
Homemade Decoupaged Garden Tool Box
Decorate a wooden tool box with decoupage cut-outs to tote your garden tools in style.
Craft Supplies:
» Wooden tool box
» Acrylic Paint ( I used, vanilla, burnt umber, jungle green)
» Decoupage print (magazine clipping, stickers, rub on transfers, gift wrap, photocopy, etc)
» Varnish or polyurethane
» Fine grit sandpaper
.
» Tack cloth
» Masking tape
» Craft Glue or Decoupage Medium
Project Instructions:
Sand the wooden box with fine sandpaper to remove splinters and rough edges. Wipe off dust with a tack cloth.
Paint the inside and outside of the box with vanilla paint, leaving the handle and bottom free of paint. Allow this base coat to dry (for at least 24 hours) then apply a second coat of paint if necessary.
When the base paint is completely dry, mask around the outside of the area to be painted green. Paint the green area with as many coats of paint as required to cover, allowing each coat to dry in between.
Apply a decoupage print by covering the entire back of the print with white craft glue and placing in position. Once the print is in place, apply a thin coat of glue to the entire side of the box that the print was applied to. Allow the glue to dry completely. If you don’t allow the glue to dry completely, you may end up with a foggy appearance when applying the final coat of varnish.
Check the photograph for possible placement of prints. You can also use rub on transfers if you like, following the manufacturer instructions. To give a distressed look, gently sand the entire box, including the decoupaged area with fine sandpaper. Use very little pressure until you achieve the look you want.
Apply one coat of varnish to the entire tool box and allow to dry. If you plan to use your tool box for gardening tools, apply several coats of varnish for protection, allowing each coat to dry completely before applying the next one.
Copyright © 1999-2014 Susan Spatone All rights reserved.



Leave a Reply