Last updated on February 21st, 2016 at 11:44 pm
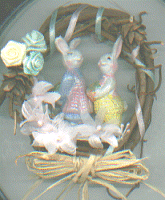
This miniature Easter wreath makes a cute little Easter decoration – add magnets, and it makes a great little Easter fridgie.
by Jane Lake
Although I used a four inch wreath, this design would lend itself to a larger Easter wreath version – as long as you use larger flowers, wider ribbon and, of course, bigger bunnies!
Supplies:
- 4″ twig wreath (or larger)
- Two pastel shades of narrow ribbon
- Two miniature pinecones (or sized to fit your project)
- Three or more ribbon roses or rosebuds
- Small spray of pink flowers
- Raffia or ribbon for bow
- two Easter bunny figures to fit your wreath
- hot glue gun and glue sticks
.
Instructions:
1. Experiment a little with your wreath and the placement of the flowers. Twig wreaths are naturally uneven so turning the wreath around in your hand will give you an idea of the best shape and which part of the wreath you want to use as the front and the base.
2. Starting at the base you have chosen, wind first one pastel ribbon around the wreath, and then the other, fastening each at the beginning and end with a small dab of hot glue at the back of the wreath.
3. Glue the sprig of pink flowers to the left of the center base, so that some of the sprig extends across the base, while some of the flowers reach about half way up the left side of the wreath.
4. Glue one pine cone at the half way point on the left side, just above the pink flowers.
5. Top the pine cone with ribbon roses (or larger rose buds on a larger wreath) and hot glue in place.
6. Glue the remaining pine cone on the upper right of the wreath to add definition and balance.
7. Carefully position the bunny ornaments in the center of the wreath. You may want to add other optional decorations such as Easter eggs, or an Easter basket at the feet of the bunnies. Use hot glue as needed to ensure the rabbits are firmly secured.
8. If you want to make a fridgie, attach a magnet to the back of the wreath.
9. Finally, tie a raffia or ribbon bow on your Easter wreath and hot glue to the bottom.




Leave a Reply