Last updated on October 10th, 2015 at 11:58 pm
How to Sew a Quilted Potholder for Christmas
by Christina Sherrod
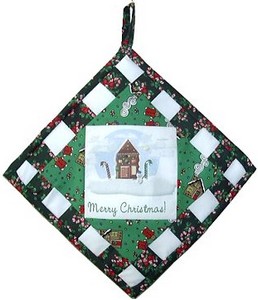
There is nothing more wonderful than a home sewn, unique gift. This potholder is easy to make, plus it teaches you new quilting skills, as well as how to transfer an image to fabric. Use our free graphic, or use one of your own favorite photos or graphics. Add lace, ribbon etc. as trim (optional).
FINISHED SIZE: approx. 8.75″ x 8.75″
Supply list:
- Use your own choice of prints etc. The colors listed below refer to the diagram. I used darker green for my small border squares (see photo above). These directions refer to the small squares as red.- White Transfer Fabric: Two 8.5″ x 11″ sheets(note: you can purchase transfer fabric sheets at sewing or craft stores or buy Colorfast Sew-In Inkjet Fabric Sheets
online from Amazon
– Green Fabric: enough to make two 4.5″ x 4.5″ squares.
– Red Fabric: a strip that is 24″ long by 2″ wide
– Backing Fabric & Batting: 8.75″ x 8.75″ squareNotes:
It is always a good idea to pre-shrink your fabric. Purchase a bit extra to allow for shrinkage.All seams are 1/4 inch. Always iron between steps. - Seam Binding: enough to go around the finished potholder (approximately 36″) PLUS enough for the hanging loop (total 41″).
Or, you can purchase a plastic or wood ring for hanging the potholder. You can also make your own binding out of matching fabric. Refer to instructions below. - Thread (to match background)
- FREE Graphic or graphic of your choice
- Ribbon or lace, etc. for trim
- Sewing Supplies: scissors, quilting pins, large sewing ruler, fabric marking pencils, seam ripper
Hint: quilting pins are easier to use than regular pins; a tupperware box works well as a supply box.
.
Pattern Instructions
Step-by-Step Photos to follow!

Printing Your Graphic
WARNING: Be sure you use colorfast inkjet transfer fabric sheets and follow directions carefully. If you just print to regular fabric, the ink will not set properly and it will run when it gets wet.
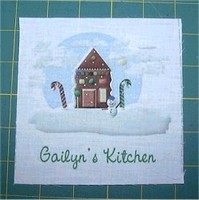
First, print your graphic onto the transfer fabric. Follow the directions on the transfer fabric. Be aware that this works for an ink jet printer. Check with your printer’s manufacturer to be sure your printer can safely print to fabric. Perform a test print first to be sure it measures 5″ x 5″.
After the graphic has been printed, follow directions that come with the fabric. Then cut out the graphic along the dotted line.
Fabric Pieces
Green Fabric: Cut two 4.5″ x 4.5″ squares (4 1/2″ x 4 1/2″). Cut on the diagonal.
Red Fabric: Cut 6 strips 1.75″ (or 1 3/4″) x 4″ long
White Fabric: Cut 6 strips 1.75″ x 4″ long

 Sew strips together as follows:
Sew one set of strips that alternate red/white/red/white/red
Sew one set of strips that alternate white/red/white/red/white/red/white
Cut the striped pieces into strips that are 1.5″ wide, as shown at right.
ASSEMBLE THE POTHOLDER TOP
 Sew one triangle piece to one side of the center square (square with the graphic). The longest side of the triangle should be sewn to the side of the square, right sides together. The longest side of the triangle will be longer than the side of the square. That is done on purpose. Center the triangle so the same amount “hangs off” each end. Refer to photos. Press open. Stitch a second side; press open.
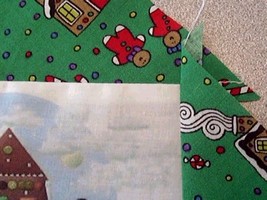
Continue on around until all 4 sides triangles are stitched on. The outer sides of the triangles may not line up exactly, but this is also OK. Later, the outer edges will be trimmed. Just be sure that there is at least 1/4″ at each corner.
Refer to photo below. NOTE: As you can see, I have made several of these, and I customized them by bringing the graphic into PaintShop Pro and changing the names on the center square.
SQUARE DOWN
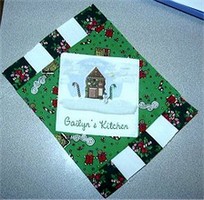
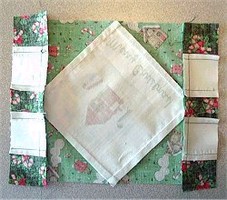 “Square down” means that you even up your large square. We need to have a square that is 6.75″ x 6.75″ before we can proceed to the next step. Use a quilter’s square to square down to the correct size.
Another way to trim your square is to cut off the sides so that there is exactly 1/4″ seam allowance at each corner of the center graphic square. Your sides will measure 6.75″
Stitch the strips with the small squares to the sides of the large square as follows: Start by sewing the shorter strips to two opposite sides; press seams open. Then sew on the longer strips to two opposite sides; press seams open. See photos for detail.
ASSEMBLE POTHOLDER
Layer your potholder as follows. The backing goes on the bottom, wrong side up. Then, layer the batting on top of the backing. Place the top on top of the other two layers, right side up. NOTE: If your batting is not thick, you can also layer a piece of felt on each side of the batting. Don’t plan on actually using the potholder to hold hot dishes or protect your table or countertop unless you use appropriate batting. Baste the three layers together close to the outer edge.
Use one of the following two methods for attaching binding and potholder hanging ring. You can use ready made seam binding, or make your own. To make binding from matching fabric, cut strips that are 1.75″ (or 1 3/4″) wide. Iron in half lengthwise. Open binding. Fold the outer edges to the original center fold line. Fold the binding in half lengthwise and press again.
ATTACH OUTER BINDING: USING WOOD OR PLASTIC HANGING RING
Sew the seam binding around the perimeter of the potholder. Attach plastic or wood ring to the back side of the potholder.
ATTACH OUTER BINDING: USING BINDING AS HANGER

Start at the corner the hanger will be attached to. Sew binding around the potholder. When you come back to the beginning corner, extend the binding about 5″ from the potholder. Stitch the binding closed along the open edge.
Twist the binding around to make a loop and sew the free end to the back of the potholder.
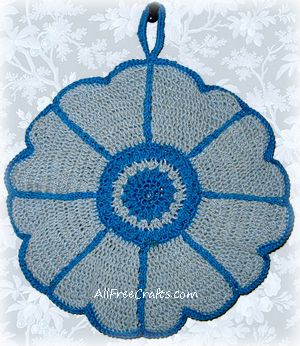
This beautiful quilted Christmas potholder was contributed by my online friend – and fabulous craft designer – Christina Sherrod, of craftandfabriclinks.com. Visit her site for more wonderful free sewing patterns, and handmade gift ideas, with step by step photos and great how-to advice.
Leave a Reply