Last updated on October 11th, 2015 at 12:00 am
Paint a charger plate with a snowy motif
According to Wikipedia, charger plates, or service plates, are “larger decorative plates used to dress up dinner tables at parties, weddings, and other special events. While charger plates have been around since the 19th century, they returned to popularity in the late `90s. Since food is not actually served on chargers, they are often called underplates or chop plates.”
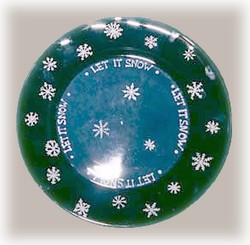
This charger plate has a winter motif that would be perfect for Christmas gatherings. Because the painting is done on the bottom of the glass plate, it is still safe to serve food on the unpainted top surface.
Craft Supplies:
- Clear Glass Charger Plate
- Dark Blue Acrylic Enamel or glass paint (I used Goodnight Blue Gloss Paint)
- White Acrylic Enamel or glass paint (I used White Gloss Paint)
- Fine liner paint brush
- Scruffy or Stencil Brush
.
My bad photography makes this plate appear almost black, but it is a brilliant blue and it’s very pretty!
Wash your plate well, with dish detergent and water, rinse and dry well. Using a cotton ball, wipe the bottom of the plate with rubbing alcohol or white vinegar. Let this dry.
You will paint on the bottom of the plate, so that food can be placed on the plate if desired. If you apply paint to the top surface, your plate will not be safe for food.
Using a fine liner brush, paint snowflakes randomly, refer to photo for placement. All of the snowflakes on my plate were painted freehand. Allow to dry and then paint “Let it snow” around the centre of the plate as shown in photo. Remember that you are painting on the bottom of the plate, so your letters must be reversed. It’s not all that difficult especially if you practise a little first on a piece of paper.
I used Gloss (by Plaid) paints for this project and this paint requires heat setting. Heat set paint according to the manufacturer instructions.
Once you have your paint set, using an almost dry scruffy or stencil brush, add white and blue paint to the centre area of the plate. Use a pouncing motion to apply the paint and allow the 2 colours to blend together. You don’t need to completely cover the glass, as you will add the darker blue later.
Once you are happy with the white and blue mixture, heat set your paint once again. This helps to keep the paint from blending together and peeling when you apply the next coats. Be sure to follow the manufacturer instructions for heat setting the paint you are using.
Now apply as many coats of dark blue paint as necessary to completely cover the plate. Hold your plate up to a light to be sure there are no areas that you can see through the paint.
Heat set once again and you’re all done. A full set of these used through out the winter months, will brighten any dinner table and they make wonderful plates for serving cookies and cakes.
Copyright © 1999-2013 Susan Spatone All rights reserved.

Leave a Reply