Last updated on November 9th, 2015 at 11:27 pm
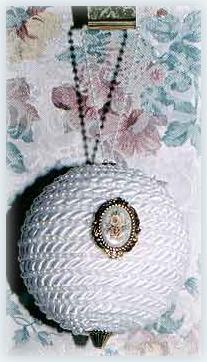
Satin ‘n’ Pearl Ornament: Transform a styrofoam ball into an elegant satin and pearl trimmed Christmas ornament.
Craft Supplies:
- 3 inch craft foam ball
- Small White Pearl Strands
- 1/4 inch Satin cording
- Hot glue gun and sticks (low temperature gun works best)
- 1 flat gold bead
- 1 cone shape gold bead
- 1 decorative button
- Pen or Pencil
.
Using a pen or pencil, poke a hole about 3/8 inch deep into your foam ball. This will be your starting point for applying the cord. Add a drop of hot glue into the hole you just made and insert one end of your cording into the hole. Be sure the cord end is secure and no loose ends are free to unravel. A small piece of tape wrapped around the end will work for this.
Begin to glue the cord in place around the ball, starting at the hole and continue wrapping and gluing until you reach the other end of the ball. You are now at the bottom of your ornament. Once again, poke a hole into your foam at the centre and insert your final end of cord into this hole, making sure once again, that all strands of the cord are inside the hole, with glue secure all the strands.
Now begin at either end with your pearl strands. The pearl strands are applied in the same manner as the cord, except that you will apply the pearl strands, between each cord wrap (seam, where the cording strand meets). This is where a little extra talent with a glue gun is required. You need to apply the glue with a very steady hand, a very fine line of hot glue and press the pearls in place before the glue dries, without too much damage to your fingers. You will once again, insert your pearl strand ends into each end hole, as you did with the cording.
Once you have all your cord and pearls in place, it’s time to add the finishing touches. Cut a strand of pearls (about 6 inches in length) and if you can feed them through the flat gold bead, do this. If you can’t, then glue your bead over the top hole first and then glue your pearl strand ends to the centre of the bead. If you can feed the strands through the bead (I could), then feed just one or two pearls through the bead and glue the bead in place to create a hanger for your ball.
Glue a triangle or any bead of choice to the bottom (over the other hole in the foam) section of your ornament. Finish with a decorative button, charm or similar item of choice, by gluing in place (front centre) on your ornament.
I’m sorry that I didn’t measure the lenghts of cord and pearl strands required to make this ornament, but you can test the amounts required by using a straight pin to hold your cord in place on the foam ball, wrap your cord around the ball, securing with pins as needed, until you reach the other side. This is a good idea, if you are unsure as to whether you have enough cord to complete the project.
This ornament turned out much prettier than I had imagined and though the photo doesn’t show it well,
there is a wonderful rich sheen to the cord that sparkles when placed near lights.
Copyright © 1999-2015 Susan Spatone All rights reserved.
Published with permission from CraftAtHome.com

Leave a Reply