Last updated on February 24th, 2021 at 03:22 am
Free Greyhound Sewing Pattern
By Jackie Phyfe
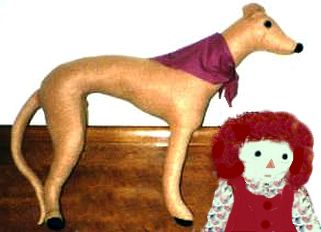
Jackie Phyfe of Connecticut came up with this GREYT pattern for a stuffed greyhound. It turns out to be about the size of a very large Italian Greyhound or a very small whippet. When I tried the pattern I knew it was a winner. You see, the first thing our hounds did when they saw the finished product was sniff its behind. What a compliment, huh?
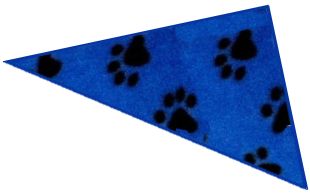
I found this pattern to take 1.5 – 2 hours to do (not including cutting out the pattern). I also went the extra step of making a simple collar for my new friend which adds another few minutes to the project. Everytime I’ve tried it, I made only a single-color hound. It seems like you could piece together bits of several colors to mimic a parti-colored hound. Or, make the underbody white to match a “tuxedo” hound.
Jackie suggests that she often uses different colors for main pieces and the neck to use up scraps. She also uses cloth markers to make the brindle markings.
Materials Needed:
Pattern paper with 1″ grid squares (or a cut-open paper grocery bag with a grid of 1″ squares drawn on it)
1.5 yards of fabric (“Robe” fleece (velour) works well, as does craft felt on a bolt. Longer “fur” fabric tended to end up looking to “hairy” to be a greyhound.)
Small bit of black felt for nose, or plastic dog nose from the craft store (found in doll section, usually)
Embroidery thread in dark brown and black, or plastic dog eyes from the craft store (found in doll section, usually)
1-2 bags of polyester fiberfill (depending on firmness desired–I’d go for two)
Optional: 2 10-inch lengths of florist wire (or the wire from breadties twisted together) – This will be used to make the ears poseable. If the hound is to be for a small child, don’t use any wire.
Optional: 1 foot of webbing and collar hardware for a collar.
Directions
Step 1: Make Pattern Pieces
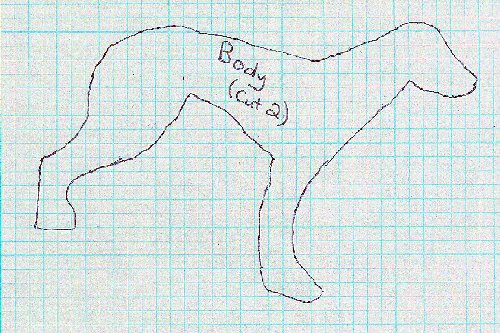
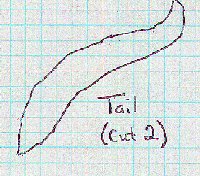
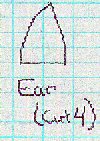
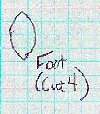
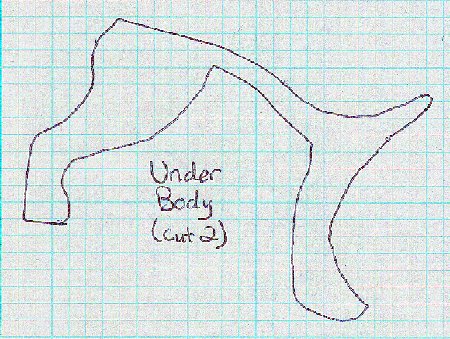
The following diagrams have a light blue grid behind them. When you make your pattern, each tiny blue square on the diagram should be 1″ on the final pattern. Draw the pattern pieces onto the gridded pattern paper and cut out along the lines. Go ahead and write the name of the piece (like “Body” or “Underbody”) on each pattern piece as well as the number of pieces to cut.
Step 2: Cut Fabric
Fold your fabric in half. Lay the one pattern piece that is indicated to be on the fold on the fold and pin it in place.
Position the body and underbody pieces to fit on the fabric and pin in place. (It’s important the fabric is folded when you place the body, underbody and tail so that you end up with one “left” and one “right” side with the fuzzy side of the fabric out.
Position the ears, feet and tail as you can in the remaining space. Remember that you need to cut 4 ears and 4 feet.
After positioning and pinning all pattern pieces on the fabric, carefully cut out the pieces. If you’re using velour, the fabric edges will curl as you cut. Don’t let this phase you. It will all work out in the end.
Step 3: Sew Tail
Place the two tail pieces with right sides together. Starting at one side of the base of the tail, sew all the way to the tip and then all the way to the other side of the base, using a 3/8″ seam allowance. Turn right-side out.
Step 4: Sew Ears
Place two ear pieces with right sides together. Starting at one side of the base of the ear, sew all the way to the tip and then all the way to the other side of the base, using a 3/8″ seam allowance. Repeat for the other ear.
OPTIONAL: To make the ears poseable, while the ears are still with wrong sides out, bend a piece of floral wire to lay smoothly on the seam you just sewed (that’s right, both sides of the ear. Now zig-zag stitch over the wire along the seam to hold the wire in place.
Turn the ears right-side out. This will be a little difficult if you’ve used the wires, but just futz with it until you get them right-side out with the wire laying smoothly.
Step 5: Sew Body Sides to Underbody Sides
Take one body side and one underbody side and place right sides together. Using a 3/8″ seam, sew all along the edge where they meet, BUT DON’T SEW THE BOTTOMS OF THE FEET. Be sure to skip over the foot bottoms as you make your way around the edge.
Repeat for the other body and underbody side.
Step 6: Sew In Bottoms of Feet
Jackie makes the bottoms of the feet out of black felt rather than the fabric of the hound. If you prefer that look, cut four of the feet patterns from black felt and use that rather than the body fabric.
While the body/underbody assemblies are still wrong-side out, position a foot bottom on the bottom of the leg with right side facing in. You should end up with a sort of oval shape at the bottom of the leg. Sew around the foot bottom piece, being careful to follow the leg fabric. You might have extra overhang of the foot bottom. If you do, just cut it off.
Repeat for the other three feet.
Turn entire body/underbody assembly right-side out.
Step 6: Sew Underbody Sides Together
Okay. We’re getting there. The feet really were the hard part. It’s all pretty easy now.
Place the underbody sections with right sides together. Stitch together using a 3/8″ seam allowance. You should be feeling pretty confident now. It should be starting to look like a hound now.

Step 6: Sew Gusset (Neck) to Body Sides
(We’re going to do the ears as a separate step, so don’t panic about them yet.) Now take the neck piece (that’s the long skinny one that you place along the fold of the fabric). Find the widest part of that piece. Place that point at the top of the head, just behind where the ears will go. The really long tail of the neck piece goes down the back of the hound. The short tail of the neck piece goes around the head, over the nose and down the throat. Place it with right sides together with one of the body pieces and sew along the entire length of the neck piece with a 3/8″ seam allowance.
Turn entire body assembly wrong-side out. There’s no need to turn the feet completely wrong-side out. You can leave them sort of rolled up in the legs if you’d like.
Place the unsewn edge of the neck piece in place along the other side of the body, right sides together. Make sure to put the wide part of the neck piece at the same point on the top of the head as the other side of the neck. Stitch along the entire edge of the neck piece using a 3/8″ seam. Make sure that you sew all the way up the throat, around the head and down the back
Step 7: Sew Ears On
While the hound is still wrong side out, determine where you would like the ears. I usually put them so the center of the ear is just a little forward of the top of the head. Let out enough stitches at that point to slip the ear into place. The point of the ear will go inside the head since everything is wrong-side out right now. Re-stitch the seam you just let out to hold the ear in place. If you’ve used wire in the ear, be careful as you stitch over it.
Repeat with the other ear.
Step 8: Stuff Hound
Turn the entire hound right side out through the tail area. You might have to let out a few stitches to do that. Go ahead. I’ve had the best luck letting out the stitches where the underbody sides come together. It’s easier to hide the hand stitches later. We’ll put them back in by hand after we finish stuffing.
Starting with the front legs, firmly stuff the hound. I’ve never been able to stuff the hound firmly enough so that it would stand on its own. Jackie suggests using dowels or wire in the legs if you want the finished hound to be able to stand on its own. (But remember, the hound won’t be safe for a small child or a live hound if you do this.) Use a chopstick or the eraser end of a pencil to help you in stuffing the long, slender legs.
After stuffing the front legs, firmly stuff the head, then the rear legs. Finish up by stuffing the body cavity.
Step 9: Sew Tail On
Stuff the tail assembly firmly. Position the tail on the body, tucking under seams to get a finished look. Hand-stitch the tail into place.
Continue your hand-stitching to close up any seam you may have let out to allow for stuffing.
Step 10: Attach Nose and Eyes
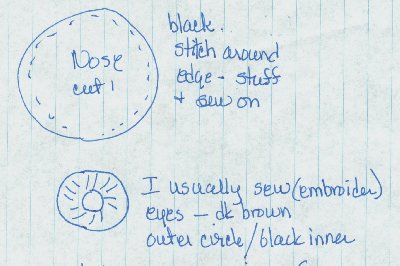
Jackie uses black felt to make a nose as shown in this diagram. She stuffs it slightly and sews it onto the finished hound. Then she does the eyes using embroidery thread on a piece of felt. Then she attaches the felt to the hound. Then she attaches the felt to the hound.
When I made my hounds, I used the plastic eyes and nose from the craft store. They were difficult to attach and did not end up looking as good as Jackie’s fabric nose and eyes. They are an alternative, though.
There! You’re done. You might want to add an optional collar though…
Step 11: OPTIONAL: Make Collar
I also like to make a simple collar for my stuffed hounds. I start with a piece of webbing or ribbon and some basic collar hardware (usually a small plastic buckle available at most fabric stores). I fold the ribbon around the buckle strap holders and stitch in place. You really wouldn’t have to be that fancy, though. You could just stitch a loop of webbing or ribbon just big enough to pass over your hound’s head. Maybe add a small d-ring for effect.
Special Note:
This free pattern is provided by Greyhound Manor Crafts and is used with permission. “We promote greyhound adoption through crafting. We freely publish patterns and instructions for greyhound-related crafts. Our hopes are to inspire others to make an item or two for the silent auction or raffle for their local greyhound adoption group.”
If you like this pattern, you may also wish to see our Santa Greyhound Pattern.

When I make the pattern pieces, should the body and underbody match exactly, or is there some overlap? I’m having a hard time making my pattern on my copy machine, not sure if I’m getting the pages lined up correctly or not, etc
Hi, Laura,
I didn’t write this pattern but I’ve had it on my site for years. I know from previous feedback that readers have used the pattern and been happy with the result but I haven’t personally sewn this greyhound myself.
I am wondering though if you were able to follow the instructions? You are asked to re-draw the pattern pieces yourself, using the sample patterns on this page as a guide. Each single small blue square on the samples is equal to a single 1″ inch square on your life-size pattern paper to make copying the drawings fairly consistent.
From looking at the sample patterns, I see that some of the blue lines are faint and difficult to see. Is this what might have caused you issues? If so, I’m very sorry. I hope you are able to work it out!