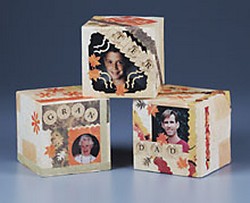
 How to make Styrofoam Photo Cubes as a homemade gift for Mother’s Day.
Designed By: Kathleen George
Typical Project Completion Time: 1 hour each
Pretty photo cubes to hold family pictures in Mom’s office, or on her dressing table.
Mom’s Photo Cubes
Materials:
STYROFOAM* Brand Products:
Cube, 3″
Other Materials:
Scrapbook papers: one 12″ x 12″ background sheet; assorted scraps
Alphabet stickers, die cuts, or rub-on letters
Decorative-edge scissors, assorted
Craft punches, assorted
Color photocopy of desired photo(s)
Pencil, ruler and scissors
Straight pins
Thick white craft glue
Optional:
Assorted dimensional embellishments; paper trimmer with cutting and scoring blades; computer and printer.
Project Instructions:
1. Cut two 3-1/2″ squares and one 3″ x 12″ strip from background paper. Note: A personal paper trimmer makes this step quick and easy.
2. Center and glue 3-1/2″ squares to top and bottom of foam cube. Clip corners and fold excess paper to sides of cube; glue to secure. Pin paper to cube until glue dries; remove pins.
3. Wrap 12″ paper strip around cube sides, gently creasing paper to mark corners. Remove strip and fold corners to create crisp edges. Glue paper around cube. Note: If using paper trimmer, insert scoring blade and gently score strip every 3″, then fold.
4. Trim and glue photo(s) to one or more sides of cube. Cut assorted strips and other shapes from scrapbook papers using decorative-edge scissors; glue to cube. Punch shapes and glue to cube; use both punched shape and strips/blocks of negative image left behind.
5. Add name to cube using word-processing software, lettering stickers or rub-ons, or your own handwriting for a very personal touch. Add dimensional embellishments as desired.
*Trademark of The Dow Chemical Company

Leave a Reply