Last updated on December 10th, 2023 at 02:53 pm
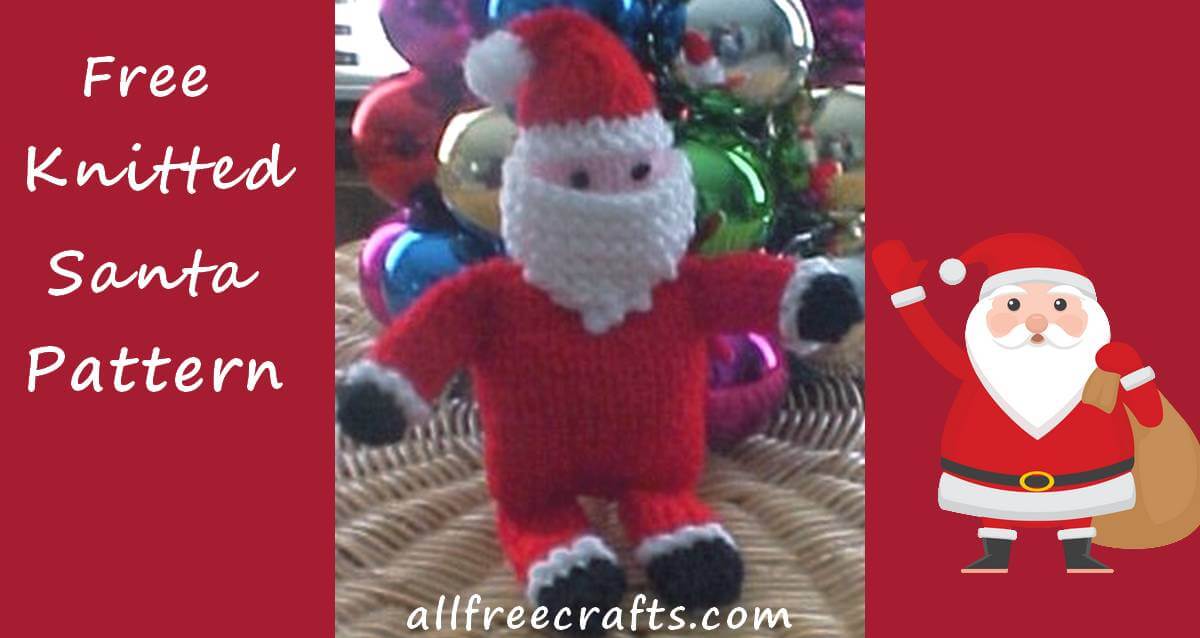
Knit this lovable Santa as a cuddly toy, Christmas door hanger or homemade Christmas ornament. You’ll only need basic knitting skills and a small amount of yarn to make him.

You Will Need:

- small amounts of worsted weight yarns, in red, white and black, plus your color choice for face
- small amount of pillow or toy stuffing
- US size # 8 needles ( 5 metric)
Gauge – 5 sts = 1 inch
Small Knitted Santa Pattern
NOTE – Legs and arms are worked the same, except for the hand part. See below.

For Legs, with black, cast on 4 sts. Knitting across, increase 1 st in each st across.
( 8 ) sts.
Row 2 – Purl
Row 3 – Knit
Row 4 – Purl. Cut black, join white.
Rows 5 and 6 – Knit across in white.
Cut white, join red. Work in stockinette st, ( knit 1 row , purl 1 row ) for 8 rows.
Bind off. Make another leg the same.
For Arms – cast on and work through row 2. Cut black, and join white, and start working on row 5. Finish as above.
Fold arms and legs in half and sew seams, set aside.
Body – with red, cast on 26 sts. Work in stockinette st until work is 2 inches long from beg. Work 2 more rows in stockinette st, then bind off.
Fold body in half on sides, and sew up back seam of body. Sew legs to bottom and arms at top, each side.
Head – With color choice for face, cast on 7 sts.
Row 1 – Knitting across, inc in each st across ( 14 sts )
Row 2 -Purl
Row 3 – Knitting across, inc 1 st in every ” second ” stitch across ( 21 sts )
Purl 1 row, knit 1 row, for 4 rows, then purl one more row. Cut yarn. Join white and knit 3 rows. Cut white. ( note that white will end at the knit row, you will now begin on purl side )
Join red, and purl across.
Next row – Knitting across, decrease 3 sts evenly spaced across ( 18 sts )
Next row – Purl across.
Next row – *Knit 2, knit 2 tog * repeating between *’s across row, ending knit 2 ( 14 sts)
Next row – Purl across.
Repeat these last 2 rows ( 11 sts )
Next row – Knit 2, knit 2 tog, knit 3, knit 2 tog, knit 2. ( 9 sts )
Next row -Purl.
Next row -* Knit 1, Knit 2 tog * repeat between *’s across row. ( 6 sts )
Next row -Purl
Next row -* Knit 2 tog * across row ( 3 sts ), turn and purl these 3 sts tog.
Cut yarn and fasten off. Sew up back seam of hat, then as you sew down back of head, stuff head lightly, and finish sewing seam.
Sew head to top center of body. Embroider eyes on top of head.

Beard – With white, cast on 2 sts, and knit 1 row.
Row 2 – Knitting across, inc in each st ( 4 sts )
Row 3 -Inc in first st, knit across, inc in last st ( 6 sts )
Row 4 – knit across.
Row 5 – Inc in first 2 sts, knit across, increasing in each of last 2 sts. ( 10 sts )
Row 6 -Knit across.
Repeat last 2 rows , 3 more times. ( 18 sts ), ending on a knit row. Bind off.
Sew beard to front of face, extending narrow ends up to top sides of hat.
NOTE – We bent the tip of the hat to one side of head, and sewed it in place.
For white pompom for tip of hat, wind white yarn around your first 2 fingers tightly about 12 times. Slip off fingers, tie center of the loops firmly. Cut loop ends, and trim even into a small ball shape. Sew this to tip of hat.
This free knitting pattern supplied by Frugal Knitting Haus, experts in knitting with scraps of leftover yarn.


Leave a Reply