Last updated on June 17th, 2016 at 11:08 pm
Free Fun Foam Bee Door Hanger Craft
by Twila Lenoir
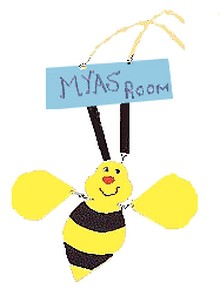
Carefree summer days filled with flowers and bees buzzing – that’s what is brought to mind with this easy craft foam bee door hanger.
The supplies you need to make it are inexpensive and readily available – making this a great group project or weekend craft.
This free kid’s craft project can be completed in under an hour.
What you need
- Craft foam sheets in yellow (or white), black, small amounts of red fun foam for the nose, and fun foam in the color of your choice to make the individual name sign
- Thin craft wire
- Ribbon
- Craft glue
- Plastic eyes (or draw the eyes)
- One hole paper punch
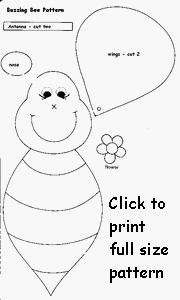
- Free printable bee pattern
- Pencil
- Red and black magic markers
- Scissors
What you do
1. Print out free printable bee pattern. Trace these pieces onto the fun foam as required. With your pencil trace around the main body of the bee on white or yellow fun foam and cut out. Next, trace the second and fourth strip on the bee and cut these out of black fun foam. Glue the black strips onto the main body in the same position shown in the photo (above) or in the pattern itself.
2. Trace a nose shape on red fun foam and glue in place. Add plastic “goggle” eyes or draw eyes in black magic marker onto your door hanger by following the pattern picture. With red or black magic marker, add a nice smile.
3. For the wings, paper punch a hole at the points of the wings. Punch a corresponding hole on either side of the neck of the bee, where the wings are to be attached (see picture).
Curl some wire around a thin pencil or something similar and use thi s wire to attach the wings to the neck area of the bee. On the back side of the bee put a little bit of craft glue where you attached the wire so it will stay still and not bend.
Hot glue, only to be applied by an adult, is the quickest way to do this, but normal craft glue or tacky glue works very well without the danger of hot gluing.
4. Use the paper punch to punch a hole on both ends of the antennas. Punch two more holes above the eyes of the bee.
Using the photo as a guide, attach the antennas to the face with a small length of curled wire.
5. Cut a rectangle of fun foam in your choice of color to use as a name tag, or to write down a nice quote to hang on your door. Punch holes at the bottom of this rectangle and use two small pieces of curled wire to attach each of the antennas.
At the top of the name tag, punch two more holes. Thread some thin ribbon through these holes and tie off to use as a hanger.
Optional: Cut out one or two of the small flower patterns and color with magic markers. Decorate the name tag rectangle by gluing on the flowers.

Leave a Reply