Last updated on September 5th, 2015 at 09:48 am
Carve a Horse Silhouette Pumpkin for Halloween
by Jane Lake
Cut up a pumpkin in a different way this year – carve the face of a horse.
If you have a horse lover in your family, as I do, try this horse silhouette when you do your pumpkin carving this year. The lines to create the horse face are fairly simple – the effect is awesome!
.
 What You Need:
- Pumpkin – large and round
- Sharp knife or pumpkin carving tool
- Small vegetable knife
- Large, strong, metal serving spoon
- Pencil or marker
- Votive candle
- Newspaper
- Large Bowl
What You Do:
Spread newspaper on your work surface, several pages thick.
Cut a lid out of the pumpkin, making a circle around the stem area large enough to fit your hand and the spoon. You’ll need to saw through the thick pumpkin skin in back and forth motions until you get all the way around and can remove the lid. Scrape off any fibres or seeds attached to the lid and set aside.
Scoop out the pulp and pumpkin seeds from inside the pumpkin, using the strong metal serving spoon. The pulp is slippery and it’s best to use the spoon almost like a paddle, if necessary, holding it at the top of the spoon’s bowl, rather than the handle, to apply sufficient pressure to scoop out all the pulp and seeds. Place the pulp and seeds in the large bowl and set aside (you can either compost this, or roast the seeds and salt them for a snack – delicious!).
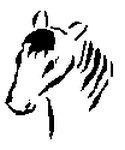
Wipe down the outside of the pumpkin and dry it off with paper towels. Using the photo and the horse silhouette shown above as a guide, practice drawing the horse face on paper until you like what you see. Once you are comfortable with this image, either trace it or draw the horse face again, this time drawing directly on the pumpkin skin in pencil or marker.
 Use a small sharp vegetable knife for carving, using the pumpkin carving tool only on larger areas where detail doesn’t matter. When carving, I began with the ears and worked my down, but you might be more comfortable starting in a different position, depending upon your drawing style.
What matters most are the inside carving lines, as these define the shape of the horse’s head and neck, while the outside lines just allow more or less light to show. The exception is the eyes, which need to carved carefully to get just the right shape. Study the photos for placement and size.
One difficulty with pumpkin carving is the thickness and strength of the pumpkin skin and flesh. I angled the knife blade inwards to make cuts that were narrower on the inside than on the outside, then gradually cut away more of the skin until I had the line that I wanted to see.
The mane is merely a series of thin curved lines, beginning with small lengths, then getting longer and longer, spaced about an inch apart.
Once you have the horse silhouette carved out, place a votive candle inside the pumpkin and light it to see the effect. Make any adjustments that seem necessary at this time, smoothing any ragged edges.
Before replacing the lid, cut out a small notch on the side to allow heat to escape.
Rub the cut parts of the pumpkin with vegetable oil to keep them from drying out too quickly.


Leave a Reply