Last updated on October 4th, 2015 at 12:05 am
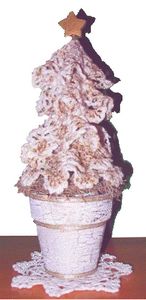
This elegant white and gold doily Christmas tree stands about 8″ high and would brighten any small corner to add to your Christmas decor.
by Jane Lake
What a beautiful homemade Christmas gift this would make – just box it carefully, surrounded by a cloud of white tissue, and wrap in white and gold paper with gold ribbons!
Finished size about 8″ to 9″ high.
Craft Supplies:
- five 4″ white doilies (6 if you want to sit the pot on a doily coaster
- Fabric Stiffener (I used Plaid Stiffy Glittering Gold Fabric Stiffener, but you can make your own from equal parts sugar and warm water, with gold glitter added to the proportion that you like.)
- 1 white pencil crayon (this isn’t really visible, so you could use any color)
- florist’s foam
- spanish moss
- thin gold ribbon
- white glue
- Terra cotta plant pot
» » For the pot: This is optional, as the tree would look fine in a terra cotta pot left plain or decorated to your taste. However, if you wish to have the look shown here, you will also need: 3″ terra cotta pot; basecoat sealer; acrylic craft paints in gold and white; crackle medium.
Craft Instructions:
Look through the doilies and determine if some are slightly larger than others – with commercially made doilies there tends to be some variation. If there isn’t, pull and stretch some of the doilies so that some are a little larger than the others, then arrange the doilies in order of size.
Instructions for painting the pot follow, and you should decorate the pot first, if you’re doing so, before proceeding with the rest of the tree instructions. Cut florist’s foam to fit and pack into the pot to the top. Glue on spanish moss to cover.
Beginning with the largest doily and proceeding in order of size to the smallest, repeat these instructions for each: pour fabric stiffener into a small bowl and lay a doily in it. Allow the stiffener to wet the doily, turning the doily over once or twice in the stiffener solution.
Push the doily onto the pencil crayon, moving the first one down near the bottom so that the edge of the doily is about even with the end of the pencil, and adding the others at equal spacing until you have come to the top one, which lies just below the pencil lead tip.
Work with each doily as you add them, using your fingers to create the shape of the tree. The bottom two doilies will be wider spread and flatter than the top three doilies, with the uppermost doily being arranged in the tightest folds as shown in the photo. When you have a shape that looks right, insert the pencil into the center of the florist foam, and make adjustments to the doilies as required.
As this project dries, the doilies tend to settle somewhat, so I made adjustments two or three times throughout the drying process to make sure the doilies would dry in the right shapes.
When the doilies have finished “settling” allow to dry completely – about 24 – 36 hours.
Paint the wooden star cutout in gold and glue to the top of the pencil.
Gold and White Antiqued Pot
Apply a basecoat sealer and let dry.
Paint in gold acrylic paint and let dry.
Apply crackling medium and let dry.
Paint in white acrylic paint and let dry. The white paint will crackle and expose the gold paint.
Glue thin gold ribbon to the pot at the bottom edge, below the brim edge, and at the top edge. Let dry.
Fill the pot with florist’s foam.
Glue a small layer of spanish moss to the top of the foam to cover, and then proceed with the rest of the project.


Leave a Reply