Last updated on February 26th, 2021 at 11:07 pm
These chocolate covered spoons make an excellent accompaniment for gift in a jar beverage recipes such as cocoa, hot chocolate, or coffee.
A simple plastic spoon coated in chocolate is also a nice added touch with a gift of coffee beans. You’ll soon think of other gifts that would be enhanced by these sweet utensils.
A friend of mine has a wonderful site, called Cocoajava.com, where you’ll learn (as if you didn’t already know), that “Chocolate and Coffee Are Not Merely Edibles, They’re a Lifestyle.” Ms. Cocoajava kindly allowed us to share the first chocolate spoon project shown here with you. An alternate method and recipe follows.
How to Make Chocolate Covered Spoons
Craft supplies you will need:

- 12 ounce package of chocolate chips. You may use semi-sweet, white chocolate, raspberry flavored, or any other kind of baking chip of your choice.
- 40 heavy plastic spoons
- Shortening
- Deep glass measuring cup
- Colored cellophane or Saran Wrap
- Waxed paper
- Thin Ribbon
Please Note: The number of chocolate covered spoons made by these recipes can vary between 25 to 40 spoons, according to how heavy the chocolate coating is and the size of your spoons.
Instructions
Pour the chips into a heatproof container, such as a measuring cup. A deep cup is the best for this project.
Microwave the cup of chips at half power for one minute. Stir. Repeat in 30 second bursts until chocolate is smooth and fully melted, but do NOT over cook.
Add to the melted chocolate one teaspoon of shortening for each cup of chips. Stir lightly until just blended.
Dip plastic spoons into the chocolate to coat the bowl and about one inch of the handle. If the chocolate starts to harden, microwave 30 seconds at half power.
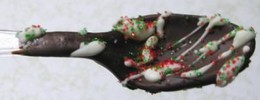
Lay spoons on wax paper to set. When chocolate spoons have set, put them in the freezer for 15 minutes. This makes them easier to handle when you start to wrap them.
Take squares of colored cellophane and wrap the coated spoons. Tie with a pretty ribbon.
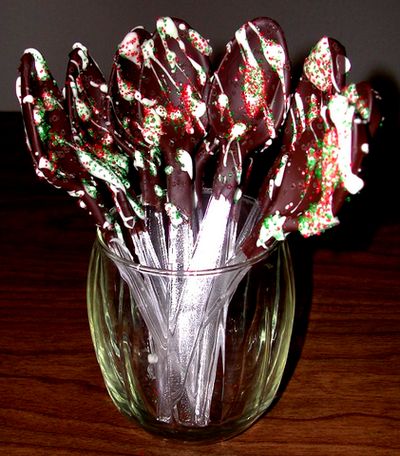
Once you have mastered the basic technique, you can experiment! Try drizzling streaks of white chocolate over dipped spoons to create a design. Sprinkle colored sugar on chocolate before it sets for a holiday look.
Tips:
* A bundle of chocolate spoons set in a coffee mug makes a nice gift.
* Tie a few spoons to a bag of gourmet coffee beans for a coffee loving friend.
* Keep spoons on hand during the holidays to use when serving hot drinks to visitors.
* Stir a little chocolate sweetness into a mug of coffee, espresso, cocoa or hot chocolate.
Alternate Chocolate Dipped Spoons Recipe
» Plastic spoons
» 6 ounces white dipping chocolate
» 6 ounces dark dipping chocolate
1. Line 2 cookie sheets with waxed paper.
2. Put the white and dark chocolate in separate bowls and melt each type of chocolate in the microwave. Microwave at half power for 1 minute. Stir thoroughly. Continue to microwave and stir at 15 second intervals until smooth and completely melted.
3. Dip a spoon into the bowl, covering both sides completely. Place the spoon on the cookie sheet and rest the spoons handle on the cookie sheet edge.
4. Make some spoons using white chocolate and others using dark chocolate.
5. Drizzle a contrasting chocolate color over each spoon.
6. Refrigerate until chocolate is completely hardened.
7. Wrap each spoon in cellophane, and bind it around with a piece of seam binding, or ribbon.



Hi,
How lovely! What does the shortening do? I don’t think I’ve ever added it to melted chocolate. Can you make the spoons without it? I’m afraid it would turn to a greasy film in the hot beverage-is that not the case?
Thanks,
Hi, Kitty,
Good question. Warm shortening helps the chocolate to flow better so it’s easier to work with; when the chocolate/shortening combo cool down, the shortening helps solidify the chocolate so it’s less likely to chip off the spoon. It’s true that the shortening will add fat that can float to the surface, especially on a beverage allowed to get cold, but hot chocolate is usually, or should be, drunk while hot, so it’s not really a problem.
This doesn’t come close to making 40. I got 26, but maybe I was a little more generous with the amount of chocolate in the bowl of the spoon.
Hi, Tracy,
I’m not sure what the difference is; to be honest, I didn’t make the full recipe when I tried it as I only needed a few for a gift. My friend, who submitted the project, got forty. It might also have something to do with the size of the spoons, but I only just thought about that.
I’ll edit the page to make a note of this, so other people are aware that the yield can vary. Thanks for your feedback!
How do you get the chocolate to stick to the back of the plastic spoon? I’ve tried this and the chocolate will not stick to the back side, just the front.
I’m really sorry, but I haven’t had this problem myself, so I’m not sure what happened. That is frustrating, for sure. Perhaps other readers will chime in with a solution.
thank-you so much for sharing this idea to make the chocolate covered spoons .ive always wanted to know how,and now I do thanks to yall for sharing it. merry Christmas didn’t know it was so easy and fast.