Last updated on October 10th, 2015 at 02:10 am
Christmas Angel Crafts: Styrofoam Angels
designed by Kathleen George
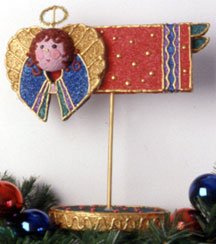
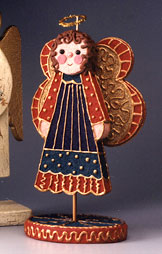
These two Styrofoam® Christmas angels are similar in construction, but the choice is up to you – make one or both to decorate your home this Christmas or give them away as beautiful homemade gifts! We include a separate materials supply list and downloadable PDF pattern for each angel on this page.
Typical Project Completion Time: One to two hours (does not include drying time)
Materials Needed for Angel 1:
STYROFOAM Brand Products:
Sheet: 1″ x 12″ x 18″; 1/2″ x 12″ x 18″
Ball, 2″
Other Materials:
Download Pattern: Angel 1 (12k PDF)- shown at left
Wooden dowels: 1/4″ x 9″; 1/8″ x 2″
Chenille stem, one gold
Beads, two 6mm black
Acrylic craft paint: metallic gold, ruby, blue, emerald, barn red, peach, pink, brown
Fineline marker
Serrated knife or utility knife
Old candle
Paintbrush
Low temperature glue gun and glue sticks
Instructions:
1. To cut foam sheets, use serrated knife or utility knife; wax knife blade first for smoother cuts. From 1″ foam sheet, cut 8″ x 3-3/4″ rectangle for angel’s dress and 5″ x 7″ oval for base. Using patterns, cut two feet and heart (wings) from 1/2″ sheet. Cut foam ball in half. (NOTE: bold lines on pattern are cutting lines, fine lines are decorative glue lines.)
2. Glue half-ball on wings; glue wings to dress. Glue feet to gown as shown, with one foot positioned on top and in front of the of other; when gluing, insert toothpick between feet and dress for enhanced hold.
3. The golden highlights on the angel are created with low temperature glue. Using black, fine line marker, transfer design lines onto dress, shoes and wings. (Do not draw face and hair.) Draw wavy line around edge of base; add dots to top of base. Practice gluing technique on scrap of foam; squeeze glue gun in steady, controlled manner to create fine, even lines. Trace over design lines with glue. Let dry.
4. Paint dress, wings and base following colors used in photo. Let dry. Paint all glue lines and dots on gown, wings and shoes with two coats of gold paint; paint wavy line around base gold and dots on base barn red. Paint dowels gold.
5. Glue beads to face for eyes, pressing into foam. Using low temperature glue, make a small dot for nose and two larger dots for cheeks; when glue is almost set, press cheeks with fingers to flatten. Paint nose gold and cheeks pink. Paint red smile.
6. Make hair with glue, adding glue in several layers to build height. Before hair is completely dry, insert small dowel in top of head. Paint hair brown. Bend 4″ chenille stem into circle; glue to top of dowel to make a halo. 7. Insert large dowel into center of base; remove dowel, fill hole with glue and replace dowel. Repeat, pushing dowel into center bottom of gown.
Angel 2
Materials for Angel 2:
STYROFOAM* Brand Products:
Sheet: 1″ x 12″ x 18″; 1/2″ x 12″ x 18″
Ball, 2″
Other Materials:
Download Pattern: Angel 2 – shown at right(16k PDF)
Wooden dowels: 1/2″ x 6″; 1/8″ x 3″
Chenille stem, 1 gold
Beads, two 1/4″ black>
Acrylic craft paint: red, purple, blue-green, peach, brown, pink, old gold, bright gold
Fineline marker
Serrated knife or utility knife
Old candle
Paintbrush
Low temperature glue gun and glue sticks
Instructions:
1. To cut foam sheets, use serrated knife or utility knife; wax knife blade first for smoother cuts. Using patterns, cut body from 1″ foam sheet and wings from 1/2″ foam sheet. (NOTE: bold outlines on patterns are cutting lines; fine lines are decorative glue lines.) Trim straight edge on wings to a 45 degree angle.
2. The golden highlights on the angel are created with low temperature glue. Using black, fine line marker, transfer design lines onto dress and and wings. (Do not draw face and hair.) Draw wavy line around edge of base; draw eight wavy lines on top of base, radiating from center to edges. Practice gluing technique on scrap of foam; squeeze glue gun in steady, controlled manner to create fine, even lines. Trace over design lines with glue. Let dry. Paint dress, wings and base following colors used in photo. Let dry. Paint all glue lines and dots on gown, wings and base with two coats of gold paint. Paint dowels gold.
3. Glue beads to face for eyes and nose, pressing into foam. Using low temperature glue, make two dots for cheeks; when glue is almost set, press cheeks with fingers to flatten. Paint cheeks pink. Paint red smile.
4. Make hair with glue, adding glue in several layers to build height. Before hair is completely dry, insert small dowel in top of head. Paint hair brown. Bend 4″ chenille stem into circle; glue to top of dowel to make a halo.
5. Insert large dowel into center of base; remove dowel, fill hole with glue and replace dowel. Repeat, pushing dowel into center bottom of gown.
Project reprinted courtesy of The Dow Chemical Company, makers of Genuine STYROFOAM(R) Brand Foam.

Leave a Reply